Thank you all for the nice comments on Cluck Cluck. To answer a few questions:
Thank you BIG TIME, patsjean, I have been thinking about a pattern line. Or just making and selling original Little Dresses on Etsy. Trying to decide, trying to decide....
The pattern is Natalie by the Childrens Corner. I posted a picture of the pattern a couple of weeks ago.
Since the dress is made of 100% cotton, I prewashed and tumble dried all of the fabrics before I cut the dress out. I made the piping myself out of solid red with crochet thread as the filler cord.
One thing I have noticed about patterns from the Childrens Corner is that the necks seem to be cut a little small. I've made more than one pattern from them and I have found this to be true in every case. It may just be me (or the children that wear them may all be Big Necked Children) but I would advise you to make a bodice out of muslin first to check the fit.
From cutting out to sewing on the last button, Cluck Cluck took 4 hours. One hour of that was pure wasted time. As I was marking the buttonholes on the back, I noticed that the chickens were upside down. Yep. I had turned the back skirts upside down and sewed them to the dress. For 15 seconds I tried to tell myself that no one would ever notice. Then for the next 30 minutes I took the dress apart (including all those serged seams!) and put it back together again. Sometimes I think I'll truly stupid. Or way too hard on myself.
So at any rate, I think I could make another one of these in 3 hours. I think I have enough fabric left to squeeze out another one in a smaller size. If I did so, and wanted to sell it, how much do yall think it would bring on Etsy or ebay?
I'm off today YIPPEE! and I have little fishes on my mind......more later. Maybe.
We'll see what develops.
Showing posts with label Childrens Corner. Show all posts
Showing posts with label Childrens Corner. Show all posts
Monday, February 18, 2008


Sunday, August 12, 2007
I Can Type Better Now
It's been too hot here to do anything except swat at gnats. When I got home from work around four on Friday afternoon, it was 105 in the shade on my backporch. The heat index was 117. Dudes, it's really hot here.
I finally caved in and cut off my fingernails. Although I have been able to put in my contact lenses, I had been relying on the Random Teenager and Number One son to take them out for me every night. After a week of this, they got together and decided to start CHARGING me a fee for this service, per eye. I couldn't even get a discount rate for having a pair of eyes, so off came the fingernails. I have spawned a bunch of capitalists.
The fingernails always seemed to come in handy. I used them as screwdrivers to tighten up cabinet door knobs, and as a knife to pick locks. They were my favorite sewing tool, since they made excellent shovers, like when I needed to feed something carefully under the sewing machine needle. I haven't sewn through my finger (knock on wood) but I have hit a fingernail several times.
At any rate, I missed them terribly this afternoon when I was finishing up this:

Yes, it's Woodstock. Finished at last.
Here's a close up of the snap closing:
I finally caved in and cut off my fingernails. Although I have been able to put in my contact lenses, I had been relying on the Random Teenager and Number One son to take them out for me every night. After a week of this, they got together and decided to start CHARGING me a fee for this service, per eye. I couldn't even get a discount rate for having a pair of eyes, so off came the fingernails. I have spawned a bunch of capitalists.
The fingernails always seemed to come in handy. I used them as screwdrivers to tighten up cabinet door knobs, and as a knife to pick locks. They were my favorite sewing tool, since they made excellent shovers, like when I needed to feed something carefully under the sewing machine needle. I haven't sewn through my finger (knock on wood) but I have hit a fingernail several times.
At any rate, I missed them terribly this afternoon when I was finishing up this:

Yes, it's Woodstock. Finished at last.
Here's a close up of the snap closing:

Here you can see that I cheated and used the snap tape:
I'm very pleased with this. I still have a line of basting around the body in case it needs a cute little tuck or two. And I think it probably will. What we need now is a try-on.
Here's the official On The Hanger photo of the front:
It looks really purply here for some reason. And the back photo:
I'm happy.
Next up: A bias cowl neck top muslin!
Tuesday, July 24, 2007
Mish Mash, Continued
As promised, I'm offering up even more mind-boggling mish mash for your reading pleasure.
Since the sleeve edges of this style are smocked, the next step is to run the sleeve hem edges through the pleater. I pleated three rows.
Now is the best time to hem those sleeves, add lace, etc. I haven't completely made up my mind on what I intend to do, so I'm skipping this step.
I'm ready to sew the dress together so I can pleat it. Almost. I am nonplussed by the sewing/pleating order of this style.
I cannot draw. But here is yet another feeble attempt. Look at the top row.

On the top row here we have a drawing of the sewing order recommended in the pattern instructions. I made it nice and colorful for you--the green lines are the cut edges of the pattern pieces and the red lines are the seam lines between the back, sleeve, front, and sleeve.
The bubble opens down the center back with a continuous lap. That's fine with me.
So what's my problem?
Maybe you noticed that the final back/sleeve seam is left unseamed. I don't like it. If I construct the bubble this way, I am going to have to push that unstitched seam to the inside and skip over it when I start smocking. I am also going to have to skip over the area in the center back where the continuous lap will be. The instructions tell me to create the continuous lap after the smocking is completed.
I can also forsee a potential problem in smocking the thing, since I always start at the center front, work all the way around to the side (the center back in this case), then turn the whole shebang upside down and work around to the opposite side. Doing it this way allows me to center the smocking design perfectly and the back opening edges will wind up as mirror images of one another.
And the final thing about this construction method I don't particularly like? I don't want a hand-sewn seam on that open shoulder, but it is not because I have any rabid aversion to hand sewing. The fact is that all these Little Dresses I make get worn. A lot. They go everywhere. They go through the washer and dryer and get ironed on a regular basis. I can only wish that I had such an active social life. They don't just stay in the Closet Full Of Dresses and look pretty. These girls are on the go! And since there is a great possibility that future Princesses may arrive, I want these dresses to last. I just think they will last longer if the seam is machine stitched.
So as I pondered these problems (we're talking lying in the bed late at night putting in some serious thinking time) I finally hit on another method of seaming this that would make me happy.
Let's look at the bottom row of the drawing. This one depicts what I plan to do. You can see that I am going to stitch up that final seam, which will give me a tubular shape. The blue line indicates the continuous lap opening.
I am going to go ahead and stay stitch the continuous lap opening and slice it open (it's about 7 1/2" long). I am going to use French seams on all the sleeve seams.
(I hear you out there saying that you can't run French seams through a pleater. Yes, you can. I do it on a regular basis. The secret is to steam the daylights out of the seam so that it is totally flat. Then when you run it through the pleater go extremely s-l-o-w when you come to the seams. I haven't broken a needle yet.)
So I have sliced the continuous lap open and sewn the seams. Now all of you are thinking I'm nuts because I can't roll this thing up on a Magic Stick. You're absolutely right.
I never intended to roll it. I live dangerously. I am going to pleat it free handed.
Rolling a bishop is always problematic due to the thickness of the seams, the potential sleeve flare issue, and the length of the piece. So I have graduated to the Advanced Stage of Madness. Here's how I do it:

I line it up and go slow. I pay attention to all the landmarks--seams, center front, center back. If those landmarks feed in straight, it's a piece of cake. I did this on the first try. And no, this is not the first time I've tried it. I've done it several times already and have only messed up once.
And if I do screw it up, I just pull out the pleater threads and give it another go. Here it is, all fanned out, pinned, and tied off!
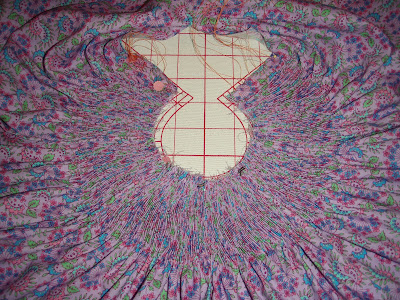
I AM WOMAN!!!!
(Note to myself: Make CERTAIN that you tie a knot in that sleeve pleating next time. Just remember to spread the sleeve out completely flat and give yourself plenty of play in the pleater thread. You don't want to take a chance on a Complete Idiot holding a Little Dress that needs some smocking flopping down into a recliner and gleefully kicking up the footrest while the sleeve threads are somehow snarled up in the footrest, resulting in the sleeve pleater thread getting yanked completely out again, now do you? Especially if this happens after the dress is sewn together, because you now know that it will take a Complete Idiot an hour and a half to repleat said sleeve completely by hand.)
Since the sleeve edges of this style are smocked, the next step is to run the sleeve hem edges through the pleater. I pleated three rows.
Now is the best time to hem those sleeves, add lace, etc. I haven't completely made up my mind on what I intend to do, so I'm skipping this step.
I'm ready to sew the dress together so I can pleat it. Almost. I am nonplussed by the sewing/pleating order of this style.
I cannot draw. But here is yet another feeble attempt. Look at the top row.

On the top row here we have a drawing of the sewing order recommended in the pattern instructions. I made it nice and colorful for you--the green lines are the cut edges of the pattern pieces and the red lines are the seam lines between the back, sleeve, front, and sleeve.
The bubble opens down the center back with a continuous lap. That's fine with me.
So what's my problem?
Maybe you noticed that the final back/sleeve seam is left unseamed. I don't like it. If I construct the bubble this way, I am going to have to push that unstitched seam to the inside and skip over it when I start smocking. I am also going to have to skip over the area in the center back where the continuous lap will be. The instructions tell me to create the continuous lap after the smocking is completed.
I can also forsee a potential problem in smocking the thing, since I always start at the center front, work all the way around to the side (the center back in this case), then turn the whole shebang upside down and work around to the opposite side. Doing it this way allows me to center the smocking design perfectly and the back opening edges will wind up as mirror images of one another.
And the final thing about this construction method I don't particularly like? I don't want a hand-sewn seam on that open shoulder, but it is not because I have any rabid aversion to hand sewing. The fact is that all these Little Dresses I make get worn. A lot. They go everywhere. They go through the washer and dryer and get ironed on a regular basis. I can only wish that I had such an active social life. They don't just stay in the Closet Full Of Dresses and look pretty. These girls are on the go! And since there is a great possibility that future Princesses may arrive, I want these dresses to last. I just think they will last longer if the seam is machine stitched.
So as I pondered these problems (we're talking lying in the bed late at night putting in some serious thinking time) I finally hit on another method of seaming this that would make me happy.
Let's look at the bottom row of the drawing. This one depicts what I plan to do. You can see that I am going to stitch up that final seam, which will give me a tubular shape. The blue line indicates the continuous lap opening.
I am going to go ahead and stay stitch the continuous lap opening and slice it open (it's about 7 1/2" long). I am going to use French seams on all the sleeve seams.
(I hear you out there saying that you can't run French seams through a pleater. Yes, you can. I do it on a regular basis. The secret is to steam the daylights out of the seam so that it is totally flat. Then when you run it through the pleater go extremely s-l-o-w when you come to the seams. I haven't broken a needle yet.)
So I have sliced the continuous lap open and sewn the seams. Now all of you are thinking I'm nuts because I can't roll this thing up on a Magic Stick. You're absolutely right.
I never intended to roll it. I live dangerously. I am going to pleat it free handed.
Rolling a bishop is always problematic due to the thickness of the seams, the potential sleeve flare issue, and the length of the piece. So I have graduated to the Advanced Stage of Madness. Here's how I do it:

I line it up and go slow. I pay attention to all the landmarks--seams, center front, center back. If those landmarks feed in straight, it's a piece of cake. I did this on the first try. And no, this is not the first time I've tried it. I've done it several times already and have only messed up once.
And if I do screw it up, I just pull out the pleater threads and give it another go. Here it is, all fanned out, pinned, and tied off!

I AM WOMAN!!!!
(Note to myself: Make CERTAIN that you tie a knot in that sleeve pleating next time. Just remember to spread the sleeve out completely flat and give yourself plenty of play in the pleater thread. You don't want to take a chance on a Complete Idiot holding a Little Dress that needs some smocking flopping down into a recliner and gleefully kicking up the footrest while the sleeve threads are somehow snarled up in the footrest, resulting in the sleeve pleater thread getting yanked completely out again, now do you? Especially if this happens after the dress is sewn together, because you now know that it will take a Complete Idiot an hour and a half to repleat said sleeve completely by hand.)
Monday, July 23, 2007
Woe Is Not Me, After All

So I slid out of the bed at dawn-thirty this morning, threw back a pot of coffee, shaved my ankles in the shower and rubbed a handful of mousse in my hair. I painted my face up and put on A Dress. And instantly, miraculously, I was ON for another school year. I attribute this to the Wearing Of A Dress, of course.
It was a really good day. By the time I arrived the sunbeams were beaming and so were the faces of my co-workers. I can tell already that we are going to have another great year. Excitement can be very contagious.
And all day, in the back of my mind, was Woodstock. For I knew, just as surely as I know that the freshmen won't be able to remember their locker combinations, that she was waiting for me to come home.
To refresh your memory, I'm using Jamie by the Childrens Corner, View D, for this little bishop bubble:

Even though technically this is not A Dress, for all intents and purposes we will forthwith consider it to be such. Case dismissed.
Figuring out which pattern pieces to use is quite a challenge. Just in case you're planning to make this particular view, I'll make it easy for you. There are just three--front, back, and sleeve.
Before I could do any actual cutting, I had to put in some thinking time. I had heard rumors that this pattern ran extremely short in the crotch length, so I checked out the pattern itself. Compared to other bubbles currently living in the vicinity, it was short. So I consulted the blog world for input. I was advised that it was in fact short (thanks, megsmocks!), so I lengthened the front and back on the shorten/lengthen lines. (Note to myself: Self, if you ever go into the pattern making business, be sure to place the shorten/lengthen lines in the same location on adjoining pattern pieces. Don't make sewing any more challenging than it already is.)
Since I added one and a half inches to the crotch length, that should take care of any possible crotch shortness problems. But I like to have backup plans, and here they are:
- The crotch length will be perfect, and I will smile.
- The crotch length will be too long, and I will smile.
- The crotch length will still be too short, and I will smile.
Case 1 above will make me smile because I avoided a problem.
Case 2 above will make me smile because I can add tucks to take up any extra length.
Case 3 above will make me smile because I will have tried my best to make this work, even though I didn't get the desired results. If this scenario develops, I will just cut the darn thing off and it will become a bishop bubble top.
I couldn't get both the front and back pieces in the next photo, but I'm hoping it will explain that little note to myself I wrote above. Although it really won't make a hill of beans in the end, it would have been more convenient if the shorten/lengthen lines were at the same level on the front and back pieces. Since there is the probability that some of the extra length I added might need to be tucked out, I wanted to mark my fabric so I would have an even, straight line all around the lower body to use as a starting point for those tucks. The easiest time to mark this is before I sew the thing together. The shorten/lengthen lines would have been the most logical (and easiest) place to do that, but they didn't correlate to each other.You can see where I had to draw my tuck lines in the photo (I measured up 3 inches from the bottom of the side seam and marked the fabric front and back on the right side. When the bubble is sewn together, I will end up with a continous tuck line all around the body).

So those are my just-in-case lines if problem 2 develops. If I don't need them I will use my voodoo powers to make those lines disappear. Here's a better shot to help you see through all this mud I am trying to describe:

The most problematic part of making a smocked bubble is getting it to go through the pleater. After much study and even more aggravation I have hit on a method that eliminates this headache.
The first step is to examine the seams on the front, back, and sleeve pattern pieces. This is a photo of the sleeve pattern piece. Can you see how that seam is straight at the top (where I am measuring) and then it begins to flare out a bit?

That flare is what causes all the pleating problems. It is high near impossible to roll a bishop neckline evenly on a Magic Stick because that flare prevents the fabric from rolling in the way it needs to roll. So I measure the straight part of that sleeve seam because that part of it will feed through the pleater easily.
I consult my smocking pattern and see that I will need to pleat six rows. Then I measure my pleater to see if the six rows and the top seam allowance will fit within that straight part of the seam:

In my case it will, so I do a quick tap dance.
But what if it won't? Since different brands of pleaters have different spacing between the needles (my two do), you may have to adjust something. When this happens to me, I take my pencil and straighten out that flare in the sleeve. Headache avoided.
Here's another photo--in this one I am comparing the pattern to the pleater:

If you have a question, please ask. This was difficult to explain but easy to do.
And let me just add this Official Disclaimer:
I am not and never will be a sewing/smocking/pleating expert. I am an old dog who is willing to learn new tricks, so if you can offer some up, please do so.
More mish-mash to come.
Subscribe to:
Posts (Atom)