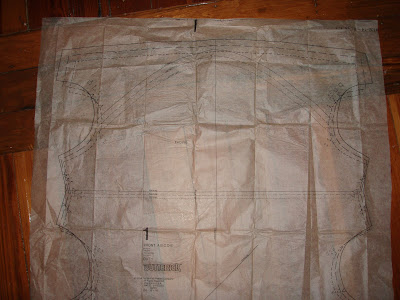
So I sat down and figured out more adjustments to this accursed pattern, and then I:
- added another 2" FBA
- took out the extra at the lower side seams of the front as in version #1
- consulted with my Fashion Advisor, who suggested I remove 1/2" of the fullness at the center back neck
- lowered the armhole just a tad (3/16")
- extended the armhole seam about 1/2" just in case
- cut it out
- sewed it together
And have now wasted another 2 1/2 yards of innocent smocking fabric.
And hey, I was all photo ready this time! Hairdo, full makeup, smiling, you know the drill. But I just could not hide the TTO look on my face, so I cropped. That's for Totally Ticked Off. So now you know.

To prove that this is indeed ANOTHER one, look carefully and you will see that I marked the center front line with a PENCIL. I used a pencil only because I could not find a gigantic black magic marker.

The back neckline is much improved. Thank you, Fashion Advisor. Too bad that's the only nice thing I have to say about this torture.
I should point out (or maybe not) that I am a nerd. I pinned. I basted. I pressed. I serged. I even understitched, for Pete's sake. I am meticulously precise when it comes to sewing. I take my time with a project like this, making absolutely sure that any defects are not due to cutting offgrain, stretching, etc.
Here's the pit shot:

Yes, I shaved, just for you.
The side shot--I'm wearing booty pants today. This project is just full of BUTT, isn't it?

Horrors beyond horrors.
This thing is now about 4 inches larger in the bust than I am. So what gives?
Do you ever start to embark on an adventure and that Little Voice in your head whispers "this doesn't look right?" Or like in the situation presently at hand where I kept hearing "this just doesn't look NATURAL." The first time I looked at the pattern piece below, something struck me as very odd about it.
Test time! See if it speaks to you, too!

Here's what it looks like folded in half down the center front. The top portion is the front facing. You fold it in down in half so the armholes meet.

Another hint: This is cut on the true bias, remember, class?
In the next photo I have folded down the front facing and sort of draped the neckline down into a cowl shape:

I knew, just KNEW, that that bias armhole wasn't going to wear or hang correctly. So why oh why oh why did I make TWO of these things??????
The armhole as presented on this pattern are almost circular. In order to form the shoulder, the bias armhole is contorted. And it really doesn't want to be contorted. I have known for eons that the fit/grain/cut on the shoulder determines the total success/failure of a garment.
Lucky for me, three Well-Known Experts in the field just happened to drop by for a glass of cold sweet tea--here's M. Rohr (all he could do was demonstrate an inset cowl neckline, so no hope there) and Jack Handford, who isn't really into pattern design, but sweet tea is sweet tea.....

But my Very Best Friend, Helen Armstrong, came to the tea party, too:

And right there, on page 219, I found this:

Even though this is diagramed to demonstrate a bias back neck cowl instead of a front neck cowl--look at the armholes, people!
Lesson learned. Listen to the Little Voices. Put down the scissors and THINK.
Some Very Good News
I've had my mind read. Yep. By someone 12,000 miles away. I've been thinking about doing this very thing and I opened up the new Australian Smocking and Embroidery issue and there it was! I should trust my instincts more. Someone else did, and I have fallen in love with it. Can you believe I was also thinking of doing this in Hersheys Dark Chocolate, too???

Although I must admit that I was thinking of a fitted yoke with a zipper. They went for elastic in the waist instead. Gorgeous.
And there's also this, which has a very unique smocking pattern--it has zigs, but no zags:

I've also spent time with the new Sew Beautiful issue but am not really impressed. But this one does make me yearn for a teeny little fall breeze:

Beautiful smocking pattern.
Final Thoughts (subtitled Gee, I Thought She'd Never Shut Up)
If you need to grade patterns, buy the Handford book.
If you want to do some truly fancy design elements, buy the Rohr book.
If you want to do fancy design but need a little more direction or hand-holding or whatever, buy the Armstrong book. She has over 20 pages of just COWLS!
2 comments:
Throw this pattern away immediately. Do not let someone find it in 30 years and say, "Oh, a vintage pattern. I think I'll make it up."
A book I purchased in 1985? is "The Custom Touch" creative sewing techniques, by Mary J. Wadlington. She approaches pattern design in a very common sense manner, and for a while I drafted nearly all my patterns. The book is still available (there are 6 available right now) on Amazon.com. She has 5 cowl designs. This is one book I will never give up.
Thanks, patsijean!
Have you ever drafted a cowl, by any chance?
Post a Comment