Showing posts with label Purple Passion. Show all posts

Tuesday, April 10, 2007

Baby Love, Oh Baby Love

Next up is this delightful little bubble from Issue 26 of Australian Smocking and Embroidery, aptly named Baby Love:


Yes, this is the same issue I seem to be stuck on. The more I look at it, the more things I find that I must absolutely make! I have already used two smocking designs from this issue. The designs for Purple Passion and Little Miss Sunshine came from it.

But this time I am not only going to use this smocking design (called "Confetti") I am also going to use the pattern. This will be the first time I've used one of their patterns, so I have my fingers crossed. I know several people who have used AS&E patterns and they seem to love them. So, here goes!

This is the fabric I am using, a soft cotton twill that I bought at Sweet Treasures:


The background is a beautiful medium shade of aqua with little tiny orange and white flowers. I hope it's as pretty on your monitor as it is on mine!

And why yes, I have already cut it out. And started to smock the fronts. See?


I want to quit work and stay home and work on this. Anyone else ever feel that way, too?

Thursday, March 15, 2007

Golden Tulip and a Princess!

Golden Tulip is ready to go. The gang's all here:


The pattern, the cut pieces, the lining, the thread, and the lace all showed up.


Candle suggested that I use a contrasting fabric for the collar and pockets, an idea I loved. I rummaged around and found an almost perfect tiny little yellow check. If I had more of it, it would have been completely perfect. Alas, only 1/4 yard. And since the nearest fabric store is almost an hour away from here, I had to go with what I had.


I cut the collar and pocket flaps out of the same fabric as the dress. After more digging around, I found 5 yards of a mid-weight crochet edging. Although it looks pure white in the photos, it is actually more of an antique white. I'm using it on the collar and pockets. I used the fusible knit interfacing for these pieces. Then I basted the trim around the edges, going very slow and pivoting at the corners:


Next, I put the lining pieces on it, pinning it on the interfacing side. I did it this way so that with the next line of stitching I can stitch exactly on the first basting line. And I do mean exactly. I start out in the first hole of the first basting stitch, and I baste these pieces together:


And, yes, I do need a manicure, but the nail place doesn't exist anymore.....


Anyway, by basting exactly in the exact same holes as the previous basting, I end up in the corners at the exact same place I did the first time around. It is amazing how well this works. If you go 1/2 a stitch beyond the corner, you will get an ugly little pucker when you turn the corner inside out. I don't have that problem anymore, since it finally dawned on me to do it this way. Yes, I am exactly that picky about my sewing.


That's all I have so far, because The Princess arrived, and she was wearing Purple Passion! Here she is with The Grandfather of All Firearms:


Here she is practicing the Royal Curtsy:


The dress actually hits her about mid-calf, but it's hard to tell with all this jumping going on.


Her favorite thing about Purple Passion? It' a great dress for Peek-A-Boo!


Here's the back view, which also shows the source of Baby Neck Sugar:


And what did The Princess do during the tornado? Why, she decided to cut her first tooth! And immediately followed it with Tooth Number Two.


After a great deal of eyelash fluttering and eyeball rolling, she gave out a great sigh and consented to the Tornado Teeth photo:


Thursday, March 1, 2007

Purple Passion!

Here she is! The finished front:


A close up of the front bodice:


The finished back:


And the close up:


I am really pleased with this dress. After all the agonizing over the embroidery colors, I think she's perfect. She was a little bored hanging around the house, so I took her outside on the porch for a little fresh air:


She enjoyed it so much that I took her to school. She made lots of new friends!

This person is eating a can of ravioli, since he's figured out that his mother is probably not gonna be heating up the stove tonight:


And I have finally figured out that ravioli is the number one cause of chin fuzz on teenage boys. So no more ravioli for him! (or his younger brother, for that matter)

Can you see it?


And since I don't have enough to deal with, here's The Great White Tiger, steadily meowing to come inside. He's no dummy. He KNOWS that a tornado just hit a small town 35 miles from here and that nasty weather is headed right for us.


His name is Mickey, by the way.

Monday, February 26, 2007

Purple Passion Is All Together Now. . . .

Next up is the final assembly. I start by stitching the shoulder seams, trimming to 1/4", and pressing well:


I run gathering threads along the top of the sleeve cap and on the bottom edge of the sleeve. Pull up the sleeve cap gathers, and sew to the dress, being careful to keep the back yoke facings free:


I love these little sleeves. They are so full and girly! I pull up the bottom sleeve edge gathers and sew it to the bias binding. You can see that I press under the raw long edge of the bias binding. I trimmed this seam, too, after the photo.
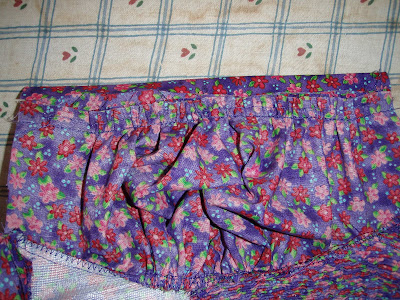


Then I stitched the side seams in one fell swoop, from the sleeve down to the hem. I turned the bias binding under on the sleeves and whipped it down. If I had had enough space to work in, I would have stitched the sleeve bindings in the ditch, too. But it's a wee little thing!

Next up is buttonholes. Since I still haven't finished the neck edge, I marked off the seam allowance. Then I measured the width of my buttonholer foot from the needle to the edge. Mine's a half inch, and since I want that buttonhole foot to sit flat, I move up/down one half inch from the seam allowance, not the seam. Just in case you didn't know, this is the standard placement for buttonholes on ready to wear. Go measure!

I marked off three buttonholes. Stitched the top one. Stitched the bottom one. Stitched the one in the middle. And then.....I realized this had happened:


Do you see it? The middle one is WAY out of line with the others. How did this happen?

Well, I'll tell you. While I was in the sewing room, happily sewing along, a wrestling match broke out in the bedroom next door. This is a fairly common occurance here in Testosterone Heaven, where we all reside. This time there were only two contenders, the two teenage boys. There's usually three or four--there's another brother and of course, the Current World Wrestling Champion, their daddy.

So I'm buttonholing away and yelling out "Yall stop that" and "Cut that out" and "Did yall hear me?" and "I'm talking to you", until I finally worked all the way up to the dreaded "Don't make me come in there!"

That last one usually puts a stop to the event, regardless of who is about to pin whom. Because they KNOW that if I am forced to come in there I won't leave empty-handed. I'll bring out the cell phones, gameboys, X boxes, whatever it takes. And I'll keep it.

And that's my story.

Of course I had to take it out. You would have too, wouldn't you? It took 45 seconds to put that sucker in there, and 45 minutes to take it out. But I'm happy now.


I put bias binding on the neck edge. Now all that's left is to sew on three buttons and put in the hem!

Any guesses as to what this might be?


And here is the the proof that fusible knit interfacing really fuses well. Told ya.


Sunday, February 25, 2007

Purple Passion--The Front

Time for construction of the dress. I'll start with the front.


The question has been asked as to how I'm going to keep all that smocking from falling apart once I cut out the neck and armholes. Excellent question. I laid the front bodice guide on the front and tried several methods of marking around the pattern piece, to wit:


I tried blue washable marker, chalk, chalk pencil, and regular pencil. No luck. I finally went and found a dry sliver of white soap. This always works on dark fabric. But not if it's smocked! It simply wanted to stretch, not play nice and mark. So I finally pinned the pattern securely and machine stitched with regular stitch length around the outlines. I did not stitch through the pattern, just skinnied right up next to it:


Then I removed the pattern piece and went back around it, basting about 1/4" inside the first line of stitching. This will keep the seam allowances nice and flat during construction. If you look closely, you can make out the two rows of stitching here:


Here's a close up photo of the wrong side:


Then I cut right outside the first line of stitching. The finished front:


On to the back!

Saturday, February 24, 2007

Problem?

After I finished smocking the bodice of Purple Passion, I laid the front bodice guide over it, and found this shocking problem!


Oh No! The smocked bodice shrank! I smocked it too tightly! I should throw it in the garbage and start over! I should have a panic attack NOW!

Not.

Why didn't I go lie down in a dark room for the rest of the day? Because I am the BOSS of this dress!

I know that smocking is elastic. I know that I can adjust this. With a pair of scissors to snip off the tied pleater threads, the spreading power of two thumbs, and just 5 minutes--I had this:


The two T-pins at the top anchored the fabric to the needed width. I went down each side and snipped off the pleater threads--not the embroidery threads. Then, using both thumbs, I started in the middle and s p r e a d the embroidery. There were a couple of places where I had pierced the pleater thread with the smocking, so I just used a tad more spreading power to pop it loose.

Work from the center out, always. Then when it is the correct width, just grab a section at the top and bottom and sort of snap it apart--this makes the pleats line up nice and straight. As you can see below, the bodice guide is happy now. And so am I.


I pinned this to the padded smocking board that I talked about in one of my first posts. You still haven't bought one? I've just demonstrated to you yet another reason for purchasing this handy little thing.

This piece has now been totally shot full of hot steam. Once I had it nice and steamy, I refilled the iron and shot it again. It will dry in about an hour. Meanwhile I will cut out the rest of the pieces!

I have made a little progress in organizing the sewing room. See? This is quilt fabric, prewashed, ironed, and stored in stackable containers. Except for the one with the blue top. It is absolutely full of embroidery threads.


More smocking pics to come later today. Have a good Saturday!

Wednesday, February 21, 2007

Smocking Done!

I am pleased to announce the birth of a fully smocked Purple Passion. The labor was hard and long, with much "backspacing" and "color indecisiveness" but in the end, she turned out to be a beautiful baby. See for yourself.


Just for the record, I used DMC 321 (red), 3806 (pink), and 703 (green). Now on to construction!

Tuesday, February 20, 2007

A Dress For A Grown Up

This one, Vogue 5921 date unknown, has been pouting for quite some time, waiting in line for the scanner. Today is her day! She's the type of girl that would spend a lot of time waiting around in the closet, too, if she ever got made. That's because she's an adult girl dress. Don't you think so?


The simple sheath--elegant in any solid fabric. For fun? Not a plaid, no, too country come to town. A wild tie dyed print? Great for summer.

But put her in navy linen with a matching jacket and it's definitely a board meeting outfit. Or a church outfit. Or a going-to-court-and-getting-a-divorce-and-winning-it-ALL type of outfit. This dress takes no prisoners, just leaves kicked fannies in its wake.

I might as well show you the back, ho hum..... But I do like the little jacket, especially the collar. And the bracelet length sleeves. Did you notice there are only two buttons? And fake welt pockets. The darts on the jacket prevent a boxy look--is it possible one could even look sexy in this getup? I don't think so.


This day started out barely okay, then got rotten. And rottener. So to make myself forget all about it, I went and had my hair cut. What a wonderful thing it is to have your hair done. If stylists knew how rejuvenated we felt, and how loved, and how pampered, they would charge $100 a cut. And we would line up to pay it.

To further improve this day, I am going to spend my evening on the last little bit of Purple Passion. Here she is so far!


Now that's a rotten scan, isn't it? Perfect for this day. Only a little work left and I can start sewing this one up. And I've become friends with the green thread, I think. What do you think?

Monday, February 12, 2007

Green is for Go

Well, the Royal Mother of Her Royal Highness the Princess, otherwise known as Miss Christmas by one and all, likes the green. After much hemming and hawing around, it was decided that Purple Passion needed green at the top--hence the row of green cables. The final row of the second design will be pink, then another green cable row, then a repeat of the first design. At least, that's the plan right this second.


Before this is done I am liable to take it ALL OUT and START OVER. Yes.

In the comments the other day, Candle asked where I got all my patterns. Why, from the good folks at e-bay, of course. I'm still opening mail, and this was another great e-bay win:


You will have noticed, of course, that the pattern back showing the yardage requirements is not there! This means I will be forced to buy about 5 yards of fabric (really, 3 should be gracious plenty) and the extra will go into the quilt fabric pile. I'm a great planner, aren't I?
I just love this dress. It's a wraparound and has a giant bow sash in the back. It's very full, very girlee, and since the pattern pieces are unprinted, I put this one about 1945-1950 since nary a copyright date is to be found.
And the fact that not a single little lady-in-waiting around here can wear this size fazes me not. That's what closets are for. This one will get made and just "hang" around until it fits someone. If you happen to spot this pattern in another size somewhere, please let me know. I want them all!
A nasty head cold has come to live inside my head right behind my eyeballs, so I'm going to drink coffee, lie down, and dream of little girls in beautiful dresses.

Saturday, February 10, 2007

Purple Passion Not So Royal

Here's a new scan of Purple Passion. As you can see, I've been able to add a new color, the green:


First off, thanks to all of you who voted via e-mail and through the comments. Yall like the pink, lavender, green combination the best. And I've worked enough rows now to totally agree. The red is too much red, or something. It overwhelms the other colors. The poor little row of green looks so lonely and bereft, doesn't he?

So I'm going to take parts of this out and replace it with lavender. Which parts? Well, children, I just don't know. I do know that I am not happy, so I will backspace and redo until I am happy.

We don't want The Princess to turn up her royal nose at this, now do we?

Friday, February 9, 2007

Purple Passion and a Questions Of The Day

Why, no, I haven't thrown Purple Passion to the wind. Here she is in her current state:


If you are fortunate enough to have this issue of AS&E and are following along, you can see that I have completed the first part of the design and have begun the second design area. Still a little undecided on which colors to use in this area, but the pink is a definite must. I like the way this is working up. I need three colors here and the choices are A) pink, red, bright green B) pink, red, medium lavender C) pink, medium lavender, green. If you would like to help, vote for your favorite combination in the comments. I simply cannot decide, and I really hate to "backspace".


This was in the mail pile, a little something from Vogue, circa 1957:


And here's the back:


The pattern description: "All around gathered skirt joins the bodice at waistline. Tucked front below Peter Pan collar. Short sleeves with cuffs. Shaped plastron buttons at waistline."


The beige printed dress on the pattern front shows what appears to be two tucks on each side of the center front. That's a nice little detail. The sleeves have a separate shaped cuff piece, not a straight cuff. That little shaped cuff piece will make a lovely little sleeve, don't you think? It's all in the details, which are seriously lacking in modern commercial patterns. And check out the width of the skirt piece. Nice full gathers. The shaped scallops on the front edge of the plastron are nice, too. Mixed to match fabrics, perhaps? Cuffs to match the plastron? A scalloped underskirt peeking out from the hemline? Lots of design possibilites with this one.


And I absolutely must show you this photo, since so many of us crave days gone by and wish to return to the days of yore--the cavewoman dress:


Seriously, folks, this is from the fall 2007-2008 collection of an internationally known designer!

I'll end up here with the Question Of The Day:
What did they call the Peter Pan collar before the days of Peter Pan?

Tuesday, January 30, 2007

Let the Smocking Begin

This is what I ended up with last night. This is two rows of cable stitches on pleated rows 2 and 3. The first pleated row is left unworked, since it is a holding row. Normally, I would use row 1 as a guide for a seamline (if I was stitching this to a bodice, for example), but in this case its only job is to hold the pleats up nice and pretty.


Candle asked a question in the comments about smocking an entire bodice--more particularly, when was I going to cut out the actual bodice shape. The answer is after I have finished all the smocking. This photo may help explain:


I put the front bodice guide over the smocked work and check the fit again before I do any more smocking. After all the smocking is completed, I will draw this off and sew around the outline. If you like, I'll put up photos of that step. By now it may have dawned on you that I will be cutting into this smocking! Yes!


While I'm doing this, I decide to check the pleat depth:


By folding up the guide I can see that the marked seamline does in fact line up nicely with the bottom pleat row. Nice. Things are looking really good here, until I make this Amazing Discovery:

Can you see what is right above my thumbnail? A Boo-Boo. Those three cable stitches don't look exactly like all their little friends, now do they? Time for Mr. Backspace (which is my term for smocking in reverse).
So I took it out. And reworked it. Because otherwise I would never be happy with it. Because it would stick out like a sore thumb after I worked the rows below it. Because I am overly obsessive. Because I want it to be perfect. Because I am a nerd.
Thanks, Candle--if you hadn't asked your question I wouldn't have discovered this until later, when it would have been much more aggravating to correct.
Anyway, I might as well show you the way I make a cable stitch, shouldn't I?

This was the best photo I could get. I enter the pleat in a perfectly straight line, lining the needle up with the pleated guide thread. I'm careful not to actually pierce the pleat thread.
Starting the first real row of this design:
I've worked the first half of the first row. The yellow thread marks the center pleat, which is the starting point. I work from the center to the right side, then turn the whole shebang upside down and work the other side. This will be a 5 cable-wave crossover pattern using two colors. The smocking design (Clementine) is in this issue of Australian Smocking and Embroidery, Issue 26, Spring 1993. Of all the issues I have so far, this one is my absolute favorite. Gorgeous stuff. If you can find this one, buy it. While you're on E-bay, I'll be smocking.