After I buy one, I won't open it up in the car on the way home, either. Weird, huh? I wait until I get home, get all stretched out in my favorite chair, get the coffee or sweet tea, get the reading glasses, get all conversation out of the way, and THEN I open it up. It's like Christmas morning because I torture myself the whole time wondering what's in the box!
Occasionally this method backfires on me and I waste money. This happened this weekend, when I fell for the cover of the latest knitting magazine because the tank on the cover was gorgeous. But when I opened it up, I found things like this:

My scanner barfed.
And lookee what's under it! The companion piece:

All I can think of is dog collars.
Maybe it's just me and I have no sense of style, pattern, design, color coordination, and tap dancing, but I usually recognize ugly when I see it.
And the tank that was on the cover? It is really nice, and it will cost a really big pile of $$$ to make it. I figured I could make 12 to 15 baby dresses with the same $$$$, so it's back to smocking for me.
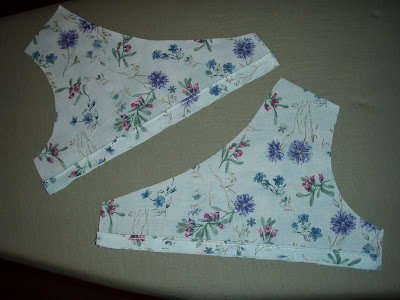
And I have been smocking! I made a few changes on Bluebonnet. I added self piping to the bottom of the front and back bodices. Here are the piped back bodices:

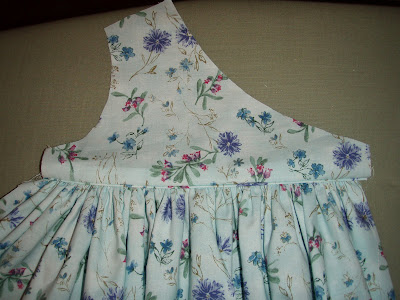
Once I had the pattern pieces all cut out and the smocking done, I decided that the weight of the skirts was most likely going to distort the bodices. I shoveled out one small area on the floor so I could pose this photo of a back bodice and its corresponding skirt piece:

That's a full fabric width (45") that's going to be gathered onto a 9 inch piece of bodice. So I did the piping thing, and I am very happy with the results:

I had already turned under 1 1/2" on the center back of each bodice piece for the facings. You'll notice that I extended the bodice 1/4" beyond the faced edge. Later when I sew the bodice facings on, I want that bodice piece to finish off perfectly even with the skirt piece. Yes, I am picky.
Now I have all the dress pieces sewn together and have also sewn the bodice facings together at the shoulders. I sewed the neckline seam (the facings are on top, wrong side out):

I clipped the neck seam, turned it and pressed it. Here's a close up of what I have so far. Notice that the armhole edges are still raw edges:

Now this is the part that is really neat, really interesting, or really confusing. Just reading directions, without illustrations, makes this confusing. So I thought I would confuse you with pictures!
What I am going to try to show you is how to sew the armholes to the armhole facings and end up with no handwork. This is the way RTW does it, and it always looks professional. And it's easy once you figure out how to do it.
In order to do this trick you need either the center back seam or the center front seam unstitched. In my case, this dress is still open all the way down the center back. Here goes!
I open out the facing on one side, like so:
I open out the facing on one side, like so:

Then I take the dress part on the unopened side, wad it up, and lay it across the middle of the opened up area:

In this next photo, a Random Teenager lent his hands because I didn't have enough of them myself. He is holding up the armhole edge and the armhole facing edge. These are the edges I'm going to stitch together.
Now he has brought the two edges together. See the wadded up part poking out of each end?

The pins go in:

The seam goes in:


5 comments:
I'm trying to get the illustration. I'm still unsure what part of the dress was wadded up and placed in the center of the front and the facing. This would work on any jumper pattern wouldn't it?
You do such lovely work. You inspire me and challenge me. Thank you.
I am just like you with the magazines. I love my comfy chair, fresh cuppa plus some peace and quiet to devour the latest offerings. Sometimes i am disappointed but often when i read it later i get new ideas even if it is just from the ads. I try to avoid checking out the internet previews and blogs when I know a new issue is one it's way. As I am in Australia they hit the US well before we see them, even subscriptions.
The smocking is looking great and you'll have fun with the ruffler.
I really shoudl get mine out.
ok I think I figured it out. Tell me if I'm right. You took the other shoulder and layed it in the opened out part. Sewed the opened out part wrong sides together and then pulled the shoulder and the back through. Is that right?
That's pretty much it, except I sewed the opened out part RIGHT sides together and then pulled it through. I'll try and put up a drawing tomorrow.
Beautiful dress, fabulous work, and I need to see illustrations AND do this to understand it...just the way my brain is hard-wired! ;-}
Post a Comment