She will be View A, the cute little purple one that buttons on the side. I love this pattern. It reminds me of the little dresses I wore when I was a little girl. It also has 3 different dresses! Check out the back:

One buttons on the side and the other two button up the back. One has a V back and roll over shawl collar, which I adore. The one with the front ties is a doll, too.
It's hard to tell from the pattern, but the armholes, neck, and waistline are piped. So let's get piping! Step 1: Cut bias strips. Mine are 1 1/4" wide, absolutely on the true bias. I also need crochet cotton.

I need to sew those bias strips together to make one L O N G string. Line up the edges like so:

Flip one piece over on the other one, with right sides together:

You notice the little triangle edges poking out. That's perfect. I sew it together with a 1/4" seam, on the imaginary line where those triangles cross over. I repeat this until they are all sewn together into one string. Attach the zipper foot, lay the crochet cotton in the middle, fold it over, and machine baste with the longest possible stitch right next to the cord. Why do I machine baste? Because the moving action of the basting stitch slightly stretches out the bias, and I end up with perfect bias that doesn't pucker or go all wonky on me.

If you need to know how much bias you need, simply measure the armholes, neck, etc. You get the idea. Me? I just love making piping. So I have about 5 yards of it now.
I used to be a real dummy. When I needed piping, I would actually buy white piping ready made, and then reupholster it with my own fabric. Later on, I would buy piping cord and reupholster it. A kind smocking person gave me the scoop on using crochet cotton and it is perfect. Minimal to no shrinkage. Available everywhere. And cheap, cheap, cheap. What will I do with all that $$$ I save? Buy more fabric. That big ball will last me a lifetime.
When using the crochet cotton, the 1 1/4" bias width is perfect for a pattern that uses 5/8" seams. To apply the piping, just line up the raw edges of the piping with the raw edges of the bodice. I go ahead and sew this in with a regular stitch length, except for the tricky parts. I baste those. Here's a piped armhole for your perusal:

Here's the button flap on the back shoulder. You notice that the piping is squared off. To get this to work, you must stitch the piping to the corner, slash to the corner, pivot, and keep stitching. I baste this area first then check it to make sure it looks good. Then I restitch it and keep on piping.

Here's a close up of the clipped corner--clip just the piping, not the bodice:

Here's a shot of the corners of the armhole and waist seam line:

Here's the shaped buttonhole flap. See how the piping is curling up? That's perfect. That tells me it will lay nice and flat and just breeze around those curves when I get through!

The bodice, completely piped:

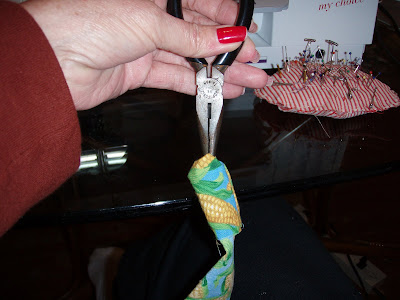
You might have noticed that I have already done the tie ends. Here's my method for turning these right side out. I stitch them, and then use my favorite sewing tool (my husband is still trying to find these--he thinks they are lost, and I'm not telling...)

I just reach in there with the needle nose pliers and grab it. Pull. Repeat. I turned both of these right side out in less than 2 minutes. Works for me!
The finished tie ends.

Now for the skirt!
1 comment:
I love the pattern. Especially the one with the buttons down the side. Totally adorable! Thank you for the instructions on piping. I never thought to use cotton crochet! I have had trouble putting piping in around tight rounded corners like on a collar. It looks ok, but never just GREAT.
I love your blog!
Post a Comment