Yes, it's been quite a long time, but life happens and it doesn't always happen the way we hope it does. At any rate, I've missed this place but I haven't missed reading a single post the rest of you have put up. I follow about 400 creative sewing folks, so I haven't missed anything except time for sewing.
I have retired and need completely different clothes than before. My next post will start there.
If you're still here, thank you.
Friday, August 19, 2016


Monday, February 24, 2014
Up Next Vogue 1294 The Blouse
While I wait for a delicious fabric to appear for Vogue 1387, I've decided on my next project--the blouse from Vogue 1294:
 This one has princess seaming in front and back, a separate snap band for a front closure, bias band trim inserts along the princess seams, and Oh! That Collar!
I've dug deep and found a black printed charmeuse that I'm willing to sacrifice as a muslin. I've started making my usual pattern adjustments and hope to begin cutting out this evening.
More later, and thanks for stopping by!
I've dug deep and found a black printed charmeuse that I'm willing to sacrifice as a muslin. I've started making my usual pattern adjustments and hope to begin cutting out this evening.
More later, and thanks for stopping by!
Wednesday, February 19, 2014
Vogue 1387 View B Love, Pure Love
View B of Vogue 1387 is the reason to buy the pattern.
This blouse has some of the most beautiful detailing of any Big Four patterns I have seen in quite a while, but the real treat comes when you are wearing it. This is a very feminine style and the pattern is superbly crafted for a wonderful fit in the shoulder and neck area. Love it!
The front and back:


A side view, showing the different hemline cuts of the front and back:
 Pleated sleeves with placket and cuff:

Detail shot of the lovely shaped front band, rounded collar band (one is squarish and one is rounded--Love!). Note the inset bias strip above the pleated bodice. The bias strip is inset between the yoke and the bodice and fits perfectly between the two pieces and molds the bodice to your upper chest to eliminate gaping. This neckline lies perfectly against the upper chest!

After the disappointment with the other pattern in this envelope, I just used some soft 100% cotton to make up this down and dirty muslin. Oh how I wish I had used the good stuff on this one! All this one needs is snaps on the front band and cuffs and I could wear it around the house, but I essentially just wanted to check the fit so I didn't really wear out my sewing skills putting this together (ignore those sleeve cap puckers, please!).
 Things I Love About This Pattern:
The pattern pieces all fit together properly and the instructions were very good. This one restored my faith in Vogue.
I did make a few alterations, my typical upper back adjustment and bodice length adjustments, and also I also shortened the shoulder seam about half an inch.
For the real one that is coming right up as soon as I purchase fabric I will make a slight FBA and add a tad onto the side seams for fitting purposes.
The length of this is perfect with leggings and would be nice in handkerchief linen, silk types, and lightweight knits like ponte or jersey. A version with elbow length sleeves barely pleated into a skinny bias band cuff would be nice, as would using pretty buttons instead of snaps on the front band.
Lengthening this would give you one absolute killer shirtdress!

This blouse has some of the most beautiful detailing of any Big Four patterns I have seen in quite a while, but the real treat comes when you are wearing it. This is a very feminine style and the pattern is superbly crafted for a wonderful fit in the shoulder and neck area. Love it!
The front and back:
A side view, showing the different hemline cuts of the front and back:
Detail shot of the lovely shaped front band, rounded collar band (one is squarish and one is rounded--Love!). Note the inset bias strip above the pleated bodice. The bias strip is inset between the yoke and the bodice and fits perfectly between the two pieces and molds the bodice to your upper chest to eliminate gaping. This neckline lies perfectly against the upper chest!
After the disappointment with the other pattern in this envelope, I just used some soft 100% cotton to make up this down and dirty muslin. Oh how I wish I had used the good stuff on this one! All this one needs is snaps on the front band and cuffs and I could wear it around the house, but I essentially just wanted to check the fit so I didn't really wear out my sewing skills putting this together (ignore those sleeve cap puckers, please!).
Things I Love About This Pattern:- The fit of the neckline
- The collar stand
- The curved front yoke that is perfectly drafted
- The inset bias strip
- The lovely bodice pleats
- The front bands
- It makes me feel like a GIRL
The pattern pieces all fit together properly and the instructions were very good. This one restored my faith in Vogue.
I did make a few alterations, my typical upper back adjustment and bodice length adjustments, and also I also shortened the shoulder seam about half an inch.
For the real one that is coming right up as soon as I purchase fabric I will make a slight FBA and add a tad onto the side seams for fitting purposes.
The length of this is perfect with leggings and would be nice in handkerchief linen, silk types, and lightweight knits like ponte or jersey. A version with elbow length sleeves barely pleated into a skinny bias band cuff would be nice, as would using pretty buttons instead of snaps on the front band.
Lengthening this would give you one absolute killer shirtdress!
Monday, February 17, 2014
Vogue 1387 View A--Don't Waste Your Good Fabric On This
First off, thanks to all who left comments on the Vogue 1312 dress and the pose.
Gail left a comment letting me know that the famous pose was a throwback to the original pattern design, a modesty dress for childbirth. I love the dress, and now that I know the history of the design, I find it remarkable that I have a connection here, as I am the mother of five children. I love the wonderful world of sewing and sharing that we all share through our blogs. Thank you, Gail.
On to Vogue 1387 View A. I used a super soft ivory drapey something for my muslin. What a waste of fabric! Here are some pictures of the front and back:

Notice how the front is tacked together. That's the only way you can wear this thing.
The model on the pattern envelope has it tacked together, the instructions tell you to tack it together, and Erica B (who inspired my make of this thing) had hers tacked together.
Can you see how much those two fronts overlap each other at the waist? That means this sucker opens WIDE at the neck. Throw in the fact that the front and back necklines are both cut on the bias and you get a neckline that is not going to stay closed.
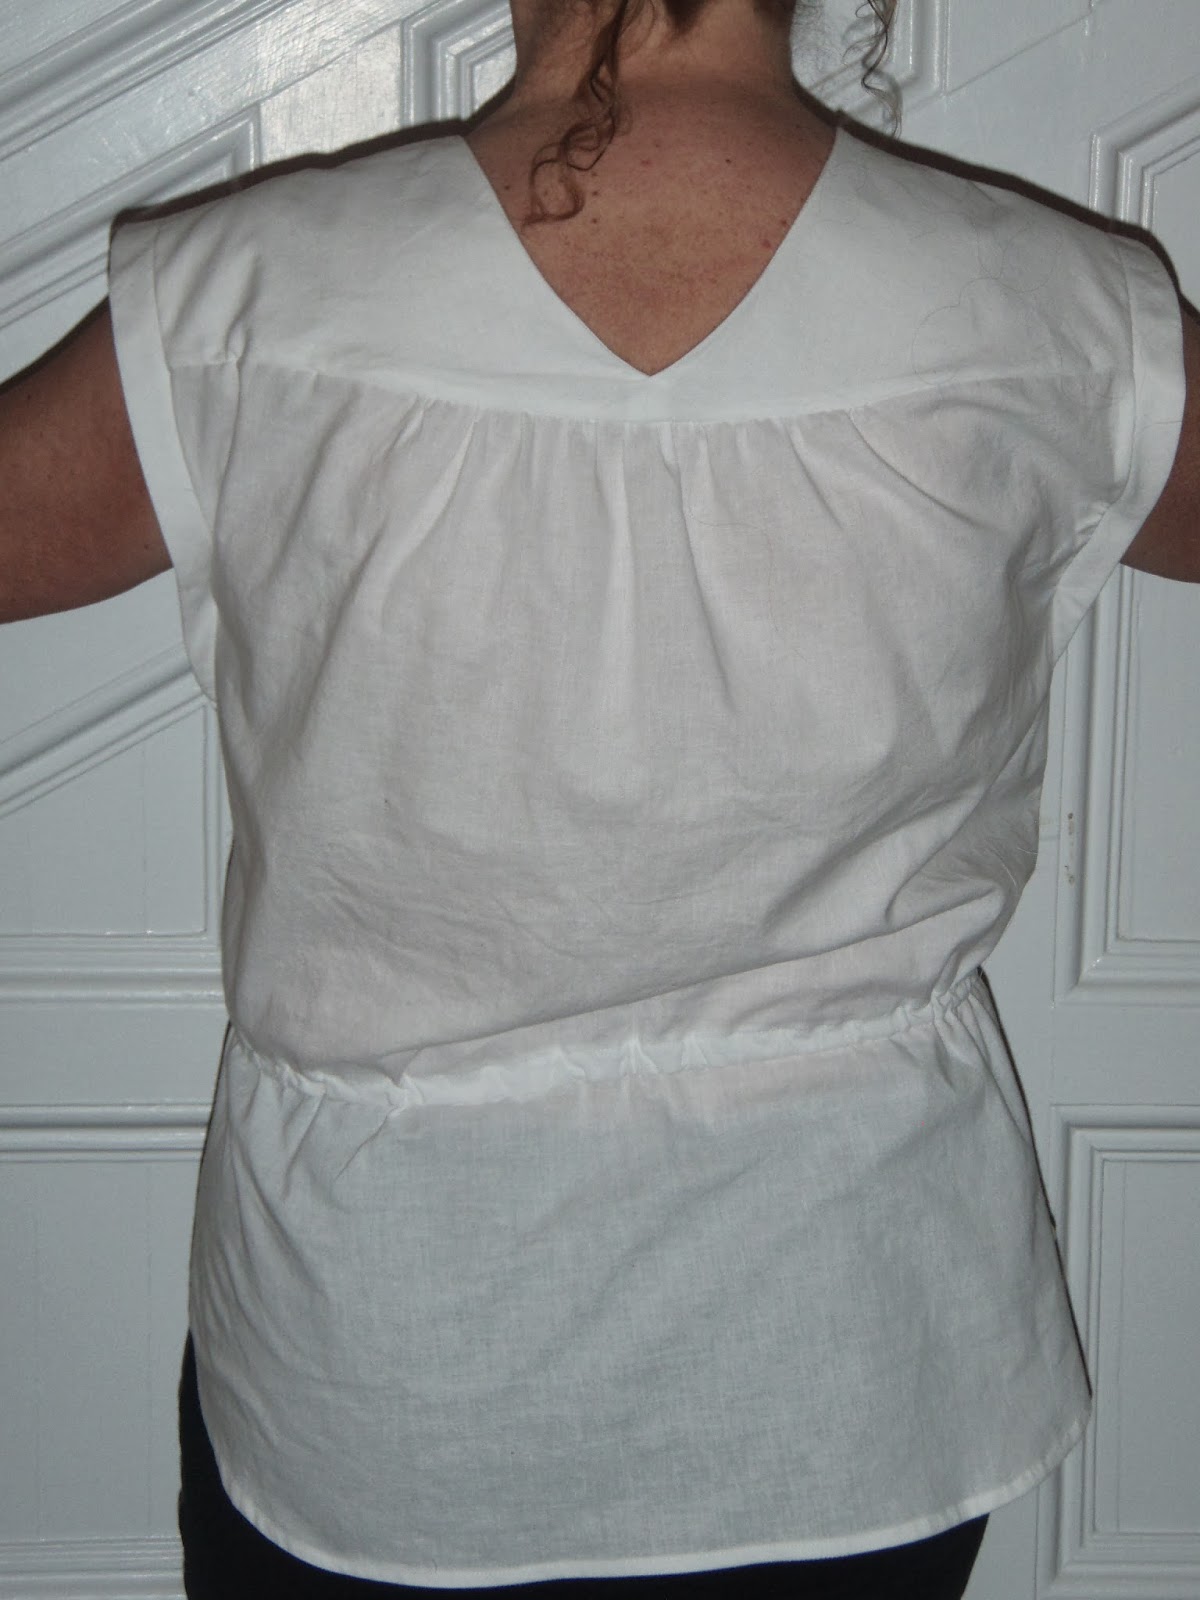
 The pattern as drafted has problems, too. The front bodice piece does not match the yoke. I had about an inch and a half of extra fabric on the yoke piece. To make sure I hadn't made an error, I took the front pattern piece, pleated it on the pleat lines, and aligned it with the corresponding yoke piece. They didn't match. I ended up aligning my pieces at the armhole edge and going whack, whack, whack with the Ginghers.
The instructions tell you to make the two buttonholes (for the front ties) through the right front only. This does NOT work! You have to overlap the right AND left front and then work the buttonholes. Otherwise you will end up cutting a hole in the top when you put in the casing. This is one of those times when I KNEW the instructions were wonky but followed blindly along.
The instructions for constructing the bias armband and gusset could be better. There is a much easier way to put it together than The Vogue Way.
I found the elastic guide for the waistline to be about 6 inches too long.
I made my standard lengthening adjustment above the waist, adding an inch and a half.
To me it would be cumbersome to try and layer something over this top due to the five layers of fabric at the underarm (I tried this already).
I'm one of those people who wants to be comfortable in her clothes. I don't want to worry about my girls popping out, my neckline crawling off my shoulder, or my bra strap showing. I don't want to have to constantly fiddle with my clothes, and this is one of the reasons I sew. So that my clothes will fit me, be comfortable, and hopefully be flattering as well. This top misses all around. And maybe it's just me, but I dislike the look of something being pinned together to stay together, especially when there are other wrap top patterns that don't require that much fuss.
Having said all of this, I will now suggest that if you don't already have this pattern, go buy it. That is because I am working on VIEW B--the real beauty in this pattern!
Something strange is going on with the fonts here. It's not me, honest.
More to come!
Gail left a comment letting me know that the famous pose was a throwback to the original pattern design, a modesty dress for childbirth. I love the dress, and now that I know the history of the design, I find it remarkable that I have a connection here, as I am the mother of five children. I love the wonderful world of sewing and sharing that we all share through our blogs. Thank you, Gail.
On to Vogue 1387 View A. I used a super soft ivory drapey something for my muslin. What a waste of fabric! Here are some pictures of the front and back:

Notice how the front is tacked together. That's the only way you can wear this thing.

The model on the pattern envelope has it tacked together, the instructions tell you to tack it together, and Erica B (who inspired my make of this thing) had hers tacked together.
Can you see how much those two fronts overlap each other at the waist? That means this sucker opens WIDE at the neck. Throw in the fact that the front and back necklines are both cut on the bias and you get a neckline that is not going to stay closed.
The back is okay on its own, kind of nice actually, but combined with that front, nope. No modesty available at all.
Disappointing, huh? Here's a shot of the underarm gusset piece, which is actually quite nice:
The instructions tell you to make the two buttonholes (for the front ties) through the right front only. This does NOT work! You have to overlap the right AND left front and then work the buttonholes. Otherwise you will end up cutting a hole in the top when you put in the casing. This is one of those times when I KNEW the instructions were wonky but followed blindly along.
The instructions for constructing the bias armband and gusset could be better. There is a much easier way to put it together than The Vogue Way.
I found the elastic guide for the waistline to be about 6 inches too long.
I made my standard lengthening adjustment above the waist, adding an inch and a half.
To me it would be cumbersome to try and layer something over this top due to the five layers of fabric at the underarm (I tried this already).
I'm one of those people who wants to be comfortable in her clothes. I don't want to worry about my girls popping out, my neckline crawling off my shoulder, or my bra strap showing. I don't want to have to constantly fiddle with my clothes, and this is one of the reasons I sew. So that my clothes will fit me, be comfortable, and hopefully be flattering as well. This top misses all around. And maybe it's just me, but I dislike the look of something being pinned together to stay together, especially when there are other wrap top patterns that don't require that much fuss.
Having said all of this, I will now suggest that if you don't already have this pattern, go buy it. That is because I am working on VIEW B--the real beauty in this pattern!
Something strange is going on with the fonts here. It's not me, honest.
More to come!


Saturday, February 15, 2014
Vogue 1312 The Famous Picture!
Well, here it is, folks, the one we've all been waiting for.....

All I can say about this is that I love it. And yes, I am squatting. And yes, I am very tall.
I ended up with a sleeveless version even though I really wanted sleeves, but when you don't have enough fabric, you just go with what you have. This is ponte knit from JoAnn's and I love the fabric. Sews well, good weight, launders well, topstitches well, good price. I just need to buy more.
One more picture...
 Due to the lighting you can see the seaming detail in this photo. I look a little chunky in this photo--well, I was wearing a pair of pants up under the dress. It's cold here!
Thanks for stopping by. Next post I will have finish photos of Vogue 1387 View A. Stay tuned!
All I can say about this is that I love it. And yes, I am squatting. And yes, I am very tall.
I ended up with a sleeveless version even though I really wanted sleeves, but when you don't have enough fabric, you just go with what you have. This is ponte knit from JoAnn's and I love the fabric. Sews well, good weight, launders well, topstitches well, good price. I just need to buy more.
One more picture...
Thanks for stopping by. Next post I will have finish photos of Vogue 1387 View A. Stay tuned!
Wednesday, February 12, 2014
Vogue 1312 Done! And Now It's Time for Vogue 1387
I finished the navy ponte Vogue 1312 and it is exactly what I envisioned it to be--fun to construct, fun to wear, and yet still a basic for my wardrobe. If we weren't in the middle of an ice storm here in the Deep South, you'd be looking at a photo. That will have to wait a few days, I'm afraid. More on that later.
On the cutting table is this beauty, Vogue 1387:


On the cutting table is this beauty, Vogue 1387:
I am making View A, the wrap front version, out of a soft white cotton batiste from the Fabric Pile. I saw Erica B's version and immediately knew I needed one of these for my closet, too.
More later. Thanks for stopping by.
Monday, February 10, 2014
Vogue 1312--The Bodice Dart
Now that I have a bodice pattern for a woven fabric to use with Vogue 1312, I went back to the original bodice pattern and cut a bodice using my knit lining fabric that I plan to use for the navy ponte version of the dress.
After constructing the bodice and trying it on, I had a gaping armhole pointing down towards the bust. This told me I would still need a dart and FBA for a knit bodice. I pinned out and marked the gaping dart in the armhole onto my pattern piece, like so:

 I drew a line perpendicular to my bust point across to the side seam.

I slashed through the drawn line and I also slashed up towards the closed dart at the armhole, spreading the pattern until it laid flat:

I then added more tracing paper and drew in the new dart at the side seam.

This maneuver simply transferred the gape at the armhole (the dart) to the side seam where I wanted it to be. Slashing and spreading to flatten the pattern piece gave me the FBA I needed.
And since it is always fun to compare the Before and After photos of patterns, here are the original and modified pattern pieces.


After constructing the bodice and trying it on, I had a gaping armhole pointing down towards the bust. This told me I would still need a dart and FBA for a knit bodice. I pinned out and marked the gaping dart in the armhole onto my pattern piece, like so:
I slashed through the drawn line and I also slashed up towards the closed dart at the armhole, spreading the pattern until it laid flat:
I then added more tracing paper and drew in the new dart at the side seam.
This maneuver simply transferred the gape at the armhole (the dart) to the side seam where I wanted it to be. Slashing and spreading to flatten the pattern piece gave me the FBA I needed.
And since it is always fun to compare the Before and After photos of patterns, here are the original and modified pattern pieces.
And here, at long last, is my completed and lined bodice!
Saturday, January 25, 2014
Mental Sewing
Been very busy the last couple of days with the house and taking care of our former Romeo, now recuperating at home after an overnight stay at the vet. He keeps giving us this perplexed look, as if he knows something is different but he's not quite sure what.....
In the meantime, I have done a massive amount of mental sewing....you know, the kind you do in your head where you lay out your pattern pieces, cut it all out, then go through the sewing order you will use sew this seam, then that seam, then go press it, then on to the next seam....admit it, we all do it.
I am going to cut out the bodice lining first and construct and fit it for Vogue 1312. I am using navy ponte knit for the dress, and stretch navy Jet Set knit from JoAnn's for the lining. Makes better sense to fine tune the fit of the knit lining first, since I have plenty of lining fabric and no ponte to spare. Hopefully some REAL sewing will occur tomorrow. If I don't have to hold a cat all day.
Thanks for stopping by. The cat is fine. Thank you to all who sent emails or left comments about him.
Thursday, January 23, 2014
Sleeve Discovery While Unsewing!
As an avid reader of Fashion Incubator, I really wasn't all that surprised to see that the shape of the sleeve cap in my deconstructed RTW blouse was VASTLY different from those in home sewing patterns.
In the first photo below I have laid out the sleeve with the point of the scissors pointing to the mark where the sleeve joins the bodice at the shoulder seam. The front of the sleeve is to the right.
Notice the difference in the shaping of the sleeve cap--it is not symmetrical like we find in the commercial patterns.

 When worn, this sleeve was just a standard short sleeve with only slight shaping at the lower edge, identical to normal short sleeves. This was not a fancy sleeve design, so I am surmising that this is probably a standard sleeve shape found in ready to wear. I find this very interesting.
No sewing has happened yet today, but a large amount of housework has been accomplished. I am clearing the decks for Vogue 1312 and am determined to cut out and construct the bodice ASAP. I spent the morning taking a cat to the vet and kissed Romeo goodbye as I left him overnight. His Romeo roaming days are now over....
Thanks for stopping by and if you have any comments on the sleeve I'd love for you to share!
In the first photo below I have laid out the sleeve with the point of the scissors pointing to the mark where the sleeve joins the bodice at the shoulder seam. The front of the sleeve is to the right.
Notice the difference in the shaping of the sleeve cap--it is not symmetrical like we find in the commercial patterns.
In the second photo, I have folded the sleeve in half at the shoulder on grain. The portion in the background is the back part of the sleeve, and the portion in the front fits into the front of the armhole. Enlarge this to see just how huge the difference in shaping here really is.
No sewing has happened yet today, but a large amount of housework has been accomplished. I am clearing the decks for Vogue 1312 and am determined to cut out and construct the bodice ASAP. I spent the morning taking a cat to the vet and kissed Romeo goodbye as I left him overnight. His Romeo roaming days are now over....
Thanks for stopping by and if you have any comments on the sleeve I'd love for you to share!
Wednesday, January 22, 2014
Vogue 1312--Unsewing Ready to Wear
I'm still scratching my head a bit over the final front bodice fitting on Vogue 1312 and currently have the bodice lining in the washer. I'm ready to cut my final garment but I want to make sure I have the fit correct before I use the good fabric. I'm being cautious here because I don't want to rush into this project and get the cart in front of the horse. In my experience, that usually results in a wrecked cart.
So while the knit lining is in the washer, I continued working on my closet clean out, adding unworn items to the donate pile. Once again, I pulled this blouse off the hanger, pondered it a bit, then put it back in the closet.

Blouse with side and waistline bust darts, decorative bands, inset yoke, short sleeves, standing collar band, button front.
This is a 10 to 15 year old cotton blouse I purchased at Cato's Dress Shop eons ago, in a size 14-16 Womens . It is missing a button and I have worn it to death. The original fabric was very soft, almost as soft as Liberty lawn. I don't wear it anymore, as it is almost tissue thin. But I cannot bear to part with it. It has escaped the donation pile many, many times.
But this time, it was different. This time as I sorted things to donate, I had Vogue 1312 on my mind. As I put this blouse back on the hanger, I asked myself WHY don't I get rid of this blouse? And the answer came back to me in a flash.
Because it is Comfortable. Because it Fits. It Fits in the Shoulders. It Fits in the Bust. It Fits in the Waist. The Darts are in the Right Place. I can Move my arms freely. The Sleeve is Perfect.It is Flattering. It makes me feel Feminine when I wear it.
Those are pretty darn good reasons to hang on to it.
Those are even better reasons to take it apart!

The back has a yoke, and the lower back has a few gathers at the center.
I am working on taking this apart and hopefully creating my own personal woven bodice block from it. I am anxious to compare the bodice to my current bodice for Vogue 1312.
Before I started taking it apart, I used a permanent marker and marked across the darts, collar placement, shoulder lines, yoke lines, etc. I will use these later to create a pattern.


More later. Thanks for stopping by!
Tuesday, January 21, 2014
A Productive Day In The Life of A Seamstress
Although no real sewing took place yesterday, quite a bit of sewing activity DID in fact occur. I was fortunate enough to hit up the not-nearly-local-enough JoAnn's and Hancock Fabric sales and loaded up on patterns (about 30 of them). So, no, I do not restrain myself one little bit when it comes to buying patterns. Not when they are on sale! More on that later.
I came across a bit of fabric, too, mainly basic solids to be used for linings and muslins, so they made it back home with me, too. I also got some ideas for future versions of Vogue 1312 using a mix of fabrics, so I set about figuring out how much fabric I would need if I wanted to mix fabrics in the skirt portions of this pattern.

This is a hanger shot taken on the dining room door. Hideous, isn't it? It is so ugly I can't get a Random College Man to take a live action photo. I'm still in the process of fitting the bodice, hence the pins. I can state with certainty that if you make the bodice out of a woven fabric, the zipper WILL be required unless you want the bodice to fit you like a sack.

This shot is taken on the dining room floor so you can get an idea of the shape of the skirt top. It is the standard handkerchief style cut that gives the skirt portion the drape.
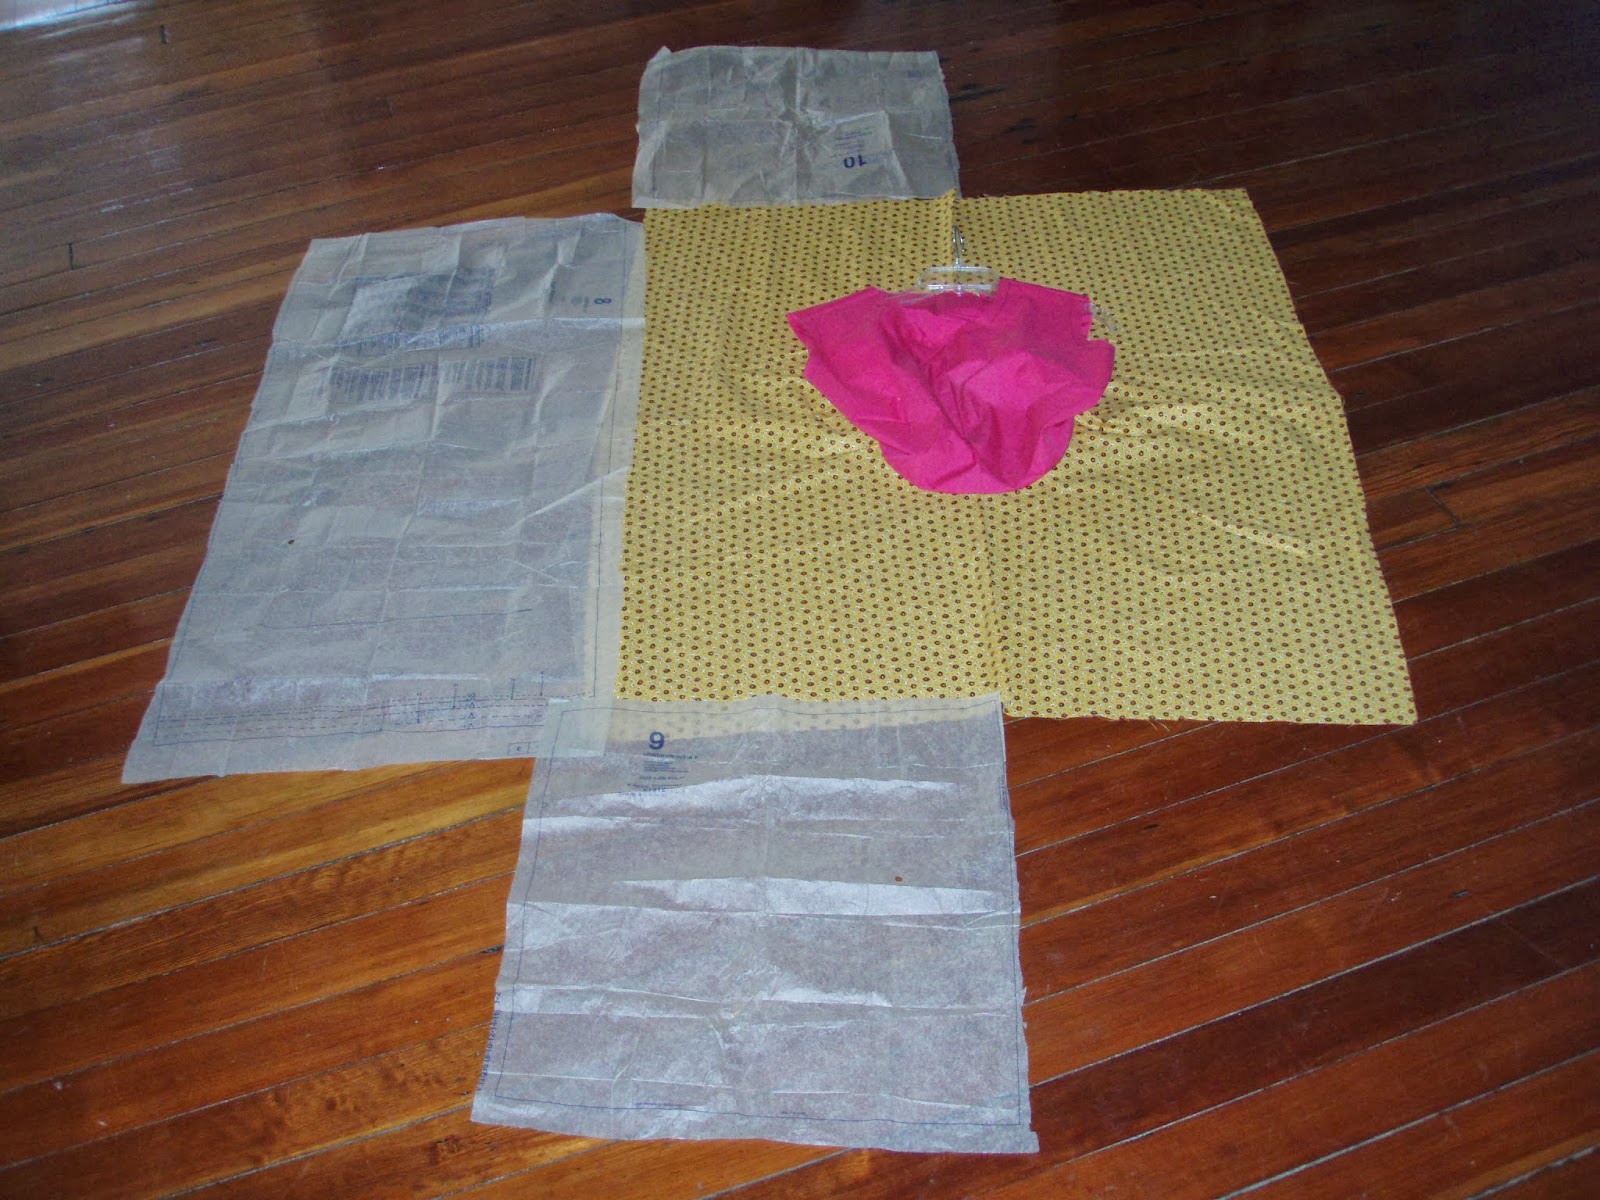
In this photo I spread the entire bodice and skirt portion out so I could add in the side and bottom pattern pieces. The bottom front and bottom back pieces are cut on the fold at the center front and back. I'm showing this to demonstrate how I have determined how much fabric to purchase if I want to use a mix of fabrics. Based on this layout, I will need the following lengths of fabric (based on 45" width): Bodice front and back 45 inches, Sleeve, 22 inches, Main skirt (yellow in photo above) 48 inches, Bottom skirt front and back 44 inches, Bottom sides 44 inches.
If I had made these measurements earlier, I could have bought fabrics for a mixed version yesterday.
I guess more fabric shopping is in my future....of course, I probably have enough fabric here somewhere to knock out a mixed version to fit a Little Girl.....
Thank you for dropping by and leaving your comments and encouragement, and welcome to my new followers!
I came across a bit of fabric, too, mainly basic solids to be used for linings and muslins, so they made it back home with me, too. I also got some ideas for future versions of Vogue 1312 using a mix of fabrics, so I set about figuring out how much fabric I would need if I wanted to mix fabrics in the skirt portions of this pattern.
This is a hanger shot taken on the dining room door. Hideous, isn't it? It is so ugly I can't get a Random College Man to take a live action photo. I'm still in the process of fitting the bodice, hence the pins. I can state with certainty that if you make the bodice out of a woven fabric, the zipper WILL be required unless you want the bodice to fit you like a sack.
This shot is taken on the dining room floor so you can get an idea of the shape of the skirt top. It is the standard handkerchief style cut that gives the skirt portion the drape.
In this photo I spread the entire bodice and skirt portion out so I could add in the side and bottom pattern pieces. The bottom front and bottom back pieces are cut on the fold at the center front and back. I'm showing this to demonstrate how I have determined how much fabric to purchase if I want to use a mix of fabrics. Based on this layout, I will need the following lengths of fabric (based on 45" width): Bodice front and back 45 inches, Sleeve, 22 inches, Main skirt (yellow in photo above) 48 inches, Bottom skirt front and back 44 inches, Bottom sides 44 inches.
If I had made these measurements earlier, I could have bought fabrics for a mixed version yesterday.
I guess more fabric shopping is in my future....of course, I probably have enough fabric here somewhere to knock out a mixed version to fit a Little Girl.....
Thank you for dropping by and leaving your comments and encouragement, and welcome to my new followers!
Sunday, January 19, 2014
Vogue 1312 Muslin #1 Adjustments
This view of Vogue 1312 from the pattern envelope shows the detailing of this pattern much better than the amusing black posed version. You can see how the skirt falls into folds, which appears much more complicated than it really is. I love this because it is a bit funky.

Two things are apparent from this photo: one, the bodice is a tight fit (the pattern calls for a left side underarm zipper), and two, her neckline is gaping and is a little wide. The extra neckline width is probably to enable her to get it over her head. Notice also that the bodice above her bust and in the shoulder area appears to have extra fullness and on the verge of collapse. Studying this photo gave me clues as to what problems I might encounter on my own muslin, and I was right.


On the left is my final adjusted front bodice pattern piece. On the right I have overlaid the original bodice pattern piece. I always find it interesting how a pattern piece can morph once I make adjustments to fit this particular body that I have.
My new front bodice pattern includes the following alterations:
1. A 4 inch FBA (resulting in two huge darts)
2. Lowered bust point 1 inch
3. Lengthened 1 1/2 inches between the bust and waist (I'm tall)
4. Severely scooped out armhole (there's that tall thing again)
5. Narrowed upper chest 1 inch on each side
6. Added 1 inch extra seam allowance on each side for insurance
7. Added 5/8 inch to neckline for more coverage
These alterations resulted in my own personal wonky front bodice pattern that fits ME. Which is the whole point, isn't it?

Here is a shot of my muslin front--you can see that I pinned out the upper chest area during fitting. After much head scratching and research about how to gracefully remove the excess fabric in that area, I pinned and smoothed and pinned and smoothed and finally traced my muslin onto pattern paper, trued up the seam lines, and it's now ready for Muslin #2.
Here's the same photo comparison for the back bodice. The only alteration I needed here was a 1/2 inch round back adjustment. Since I wanted to keep the center back fold, I added a small neckline dart to take out the excess neckline gaping that resulted from the RBA. This pattern was also lengthened and insurance seams allowed as for the front.


Here's the muslin showing the method I used for the RBA--a horizontal slice across the center midway of the armhole, then spreading at center back.

Today I hope to cut out Muslin #2 from my new pattern and see how all this works out in real life. More later, and thanks for dropping by.
Saturday, January 18, 2014
Creating Joy--Vogue 1312
A few weeks ago my oldest son sent me a text message. The conversation went something like this:
Him: What do you want for Christmas?
Me: Joy.
Him: Who's she?
Since then, that tiny little snippet of conversation has stayed in my mind. Not only because Number One Son has such a quick wit, but because it resonated with me that joy is really and truly what I want more of in my life.
I started really paying attention to the things I do or see or hear everyday that bring me Joy.
Family, of course, is first on the list. Spending time with them is only part of the equation--it includes many of the mundane things I do (and redo, like laundry and dishes) that makes the family work as a unit so well. Things like meal planning, cooking, trying out new recipes, keeping the kitchen clean and the dishwasher loaded, clean towels in the linen closet, and other things that I don't really consider to be "chores" so much as I consider them to be part of what makes us a family.
Working outside brings me Joy, too, but there is little to be had of that particular variety in the wintertime.
Reading brings me Joy, but I tend to read more sewing blogs that I do books (unless they are sewing and quilting books).
Creating Joy is what I have been missing for quite some time. Creating with needle and thread, whether it be a quilt top or a little girl's dress or a needlework sampler or smocking or Fill In The Blank.....I have not been Creating Joy.
This is a long version of what this post is really about, which is Vogue 1312:

Today I am Creating Joy, with a muslin version of Vogue 1312. I've had this pattern for quite some time and recently bought about 5 yards of navy ponte knit from JoAnn's to make myself this dress. I was surprised to read on the pattern envelope that it is recommended for woven fabrics. Living in the Deep South where it is hot as Hades in the summertime (which lasts about seven months), I can see myself sitting on the back porch Joyfully sipping sweet tea while wearing a linen version of this dress.
So with that picture in my mind, I have traced off the front and back bodice pattern pieces and am busy making a FBA in a pattern with NO bust darts that is designed for a woven fabric. I don't know what Vogue was thinking, but I know good and well that this will look like a sack in linen fabric without some bodice shaping to accommodate the bust.
And now that I have started working on it, I am beginning to feel that old Joy I used to know.
It's nice to be back. I hope my followers are still there.
Thursday, August 15, 2013
Sunday, December 16, 2012
Vogue 8536 Play Date
Thank you all for your suggestions on the Vogue 1177 polka dot top. It would make a nice sleeveless top, but for now Grandma is wearing it. It keeps her chest warm. Meanwhile I'm moving on towards my goal of developing some TNT patterns.
I'm having a play date with Vogue 8536 today. This is a nice basic knit top with three different necklines and four sleeve options. It has an applied neckband, which I like, instead of just turn-it-under-and-stitch-it-down neck finish.


I'm going to do an FBA, lengthen sleevecap, lengthen sleeve, lengthen body, raise center back, and raise the bust point alteration. These are the ones that worked on the Burda 7189, so I want to see if this flies with Vogue patterns. I've measured the width of the bicep already--lesson learned there!
More later. Thanks for stopping by.
Wednesday, December 12, 2012
The Final Defeat Vogue 1177
I've been brainstorming quite a bit about the sleeve dilemma with the Vogue 1177 blouse. After measuring my bicep and measuring (too late) the bicep on the pattern, I discovered that they are the same. Meaning no ease for my arm whatsoever.
I then pulled out the last muslin I made, the Burda 7189 blouse, and measured that altered sleeve at the bicep to determine my true fitted bicep measurement. Two and three-fourths inches difference.
This is not a complete fail. I have learned to measure first. Every single time. No excuses. If I'm too lazy to do that I need to go read or clean the bathtub instead of sewing.
I learned the value of keeping the original muslins. Just find a hanger and put it in the closet.
I learned the value of making notes as I alter the muslin. I have half a page of notes on the Burda 7189 and I referred to them several times while working on the Vogue blouse. Keeping track of back waist length, how much to lower the bust, and the width of the finished sleeve cuff were useful.
Most importantly, I learned not to just throw a project away too soon. After thinking about the Vogue 1177 sleeve for a couple of days, it dawned on me that the sleeve was a two-piece sleeve and there was still a possibility I could make it work. Here are the two sleeve sections, the upper cap piece and the lower piece. Notice that the lower piece is tucked. Which means it is wider (It is folded in the photo). And notice that the bicep of the sleeve is in the lower wider section:

I realized that I could eliminate some of the tucks in the lower section, making the sleeve wider at the bicep. I made that alteration and split the upper sleeve section. Here is the result.

So as a last ditch attempt I decided to just put in the upper cap sleeve portion and have nice little capped sleeves instead of beautiful tucked sleeves. Too tight in the upper arm. No arm movement possible. Think tourniquet, if you will.
So this blouse is now officially a dud. It's going in the muslin closet and after a million years have gone by and I've gotten over it, I'm going to recut these sleeves out of something random and put them in. As I've said before, I love the style but hate the pattern. And you can bet I'm keeping the notes I've made.
Onward. Another pattern is up for a muslin.
Sunday, December 9, 2012
Dismayed! Vogue 1177
After tons of thread tracing, basting, reconfiguring tucks on the bodice fronts, backs, and sleeves, I finally set in the sleeves on the dress/top/blouse/whatever.
And the sleeves are too tight. I don't have more fabric to cut new ones.
The sleeves are gorgeous, by the way. Love the style of this, love the tucks, love the design.
Hate the pattern itself. It is NOT drafted correctly. NONE of the tucks are correct. Not the front bodice tucks, not the back bodice tucks, and goodness gracious alive, not the sleeve tucks either.
 I have the skirt and casing already assembled. All I have left to do is sew on the front bands, serge two seams, and make buttonholes.
I should have compared the sleeves to the the Burda sleeves I just fitted. Should have, could have, too late now.
I'm trying to figure out how to salvage this one.
Any ideas out there?
And the sleeves are too tight. I don't have more fabric to cut new ones.
The sleeves are gorgeous, by the way. Love the style of this, love the tucks, love the design.
Hate the pattern itself. It is NOT drafted correctly. NONE of the tucks are correct. Not the front bodice tucks, not the back bodice tucks, and goodness gracious alive, not the sleeve tucks either.

I should have compared the sleeves to the the Burda sleeves I just fitted. Should have, could have, too late now.
I'm trying to figure out how to salvage this one.
Any ideas out there?
Wednesday, December 5, 2012
Hitchhiker
On my way out of JoAnn's the other day, an old woman stuck her thumb out and wanted me to give her a ride. So I did.
Then she wanted to come in the house, too. So she did.
Then she wanted to see my sewing room. So she did that, too.
Then she told me she wanted to live here. She promised not to eat too much, she said I wouldn't have to send her to college, and she said she would put up with all these cats. Pet them, even.
So now she lives with me. Meet Grandma:

She was naked, and that just wouldn't do. So I threw this on her, Vogue 1177:
 She really likes it. A lot.
Then she wanted to come in the house, too. So she did.
Then she wanted to see my sewing room. So she did that, too.
Then she told me she wanted to live here. She promised not to eat too much, she said I wouldn't have to send her to college, and she said she would put up with all these cats. Pet them, even.
So now she lives with me. Meet Grandma:

She was naked, and that just wouldn't do. So I threw this on her, Vogue 1177:

Subscribe to:
Posts (Atom)