Monday, July 30, 2007

One Thing Leads To Another

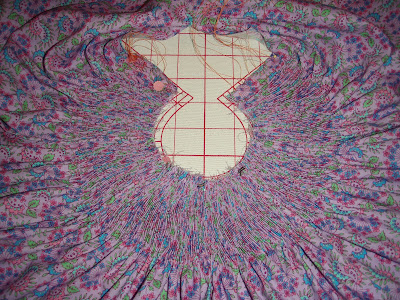
I've been making some progress on Woodstock--I've finished smocking the neckband, done the continuous lap, applied the neck binding, and even sewn on the snap at the back neck.

Comments can be very useful things. One commenter suggested I add more color to the smocking (good idea, great minds think alike!) and another suggested that I should consider rose-colored contacts (hi there, marie, glad you stopped by).

Anyhoo, thinking about those two things in conjuction with one another (color and rose), coupled with my ever present desire to go eat something, I came up with rose boullions! color + rose + chicken = boullion. I love math.

So now we have rose boullions:


Just a few, sprinkled here and there:


There would be more, but why punish myself any more than necessary?

I have lots of books. We're talking major amounts of books. Add to that enough magazines to ensure that the house is indeed a fire hazard. So with so many resources at my fingertips, I conducted an all-out search for information on boullion making. Not one, nay, none, showed me how to actually place the boullion on the pleats. So I traveled the world over via the internet and still didn't find anything that addressed this issue. Every thing I have or found showed how to create boullions on a flat piece of fabric.

So I studied the appearance of boullions on finished pleated garments. After getting bogged down in all my gorgeous back issues of Australian Smocking (two hours) I deduced the following about boullions:

They sit atop the pleats, not down in the valleys.
They are beautiful.
They are worthy of my time.
I have to figure out the trick of placing them all by myself.

I started by making the center two boullions (the darker pink) sit atop two pleats. The next three (light pink) incorporate a third pleat. I stopped there because I was after the daintier look, but if I had added a third round, I would have added in a fourth pleat to the structure.

The trickiest part of working boullions over pleated fabric is the pulling--the part where you pull the thread through the wraps...if you pull two much, the underlying pleats get distorted...if you pull too little, the boullion looks loose and sloppy.

The main point I am trying to make here is this:

If you can't do these, learn how. You will love yourself.

This is not hard to do. It's kind of like playing the piano. Put in the practice time if you want success. I made about ten of these on scrap fabric first. Then I decided to go for it.

Buy A to Z of Boullions. I did.

Maybe I can take photos next time, if anyone is interested.

Sunday, July 29, 2007

Smocking on A Sunday Afternoon

I've been working on Woodstock, but I haven't accomplished as much as I had planned. Why? Because I had to go to the Room of Horrors (sewing room) to find the right needle. After 45 minutes I found it. And decided right there, on the spot, that something had to be done. I put away things that should have already been put away, filed away patterns, folded and petted the fabric, and swept the floor.

Then I went out into the upstairs hallway, which I consider to be an extension of the sewing room, and unloaded the sofa and the cutting table. I had placed the cutting table in a strategic spot, right in the middle of the landing. The way I had it figured, the Random Teenagers could get good exercise by leaping over it. But they are smarter than they are lazy--they just rolled it over out of the way. And all I was trying to do was be a Good Mother. Oh well.

Here's where I am so far:


This next shot gives truer colors of the fabric and the embroidery colors:


After much thinking and fiddling I decided to just use the blue for the smocking.

And the name Woodstock? I don't know, but I think this name came to me at the time of the Claritin Delirium incident. The flower pattern, the acid green, the hot pink...it all reminded me of the rock and roll extravaganza way back when. And no, I wasn't there.

In other exciting developments--I now have contact lenses! I can see the TV! And I have a LOT of wrinkles! And my house is filthy!

I think I'll go take them out.

Wednesday, July 25, 2007

The Good Wife's Guide

The smocking is underway, but no pictures yet. Instead I have a little treat for you.

My darling husband brought this home the other day. One of my own children found it and gave it to him. He sneaked it into the house and very nonchalantly chunked it on the kitchen counter. At the bottom he had written in big black letters "I think everyone should aspire to this. I will share it with your mother." It lay there, like a snake, until everyone in the house had read it (of course I was upstairs in the sewing room). I was the last one to see it.

So here it is, from Housekeeping Monthly, May 13, 1956. And I promise I did not make this up:

The Good Wife's Guide
  • Have dinner ready. Plan ahead, even the night before, to have a delicious meal ready on time for his return. This is a way of letting him know that you have been thinking about him and are concerned about his needs. Most men are hungry when they come home and the prospect of a good meal (especially his favorite dish) is part of the warm welcome needed.
  • Prepare yourself. Take 15 minutes to rest so you'll be refreshed when he arrives. Touch up your makeup, put a ribbon in your hair and be fresh-looking. He has just been with a lot of work-weary people.
  • Be a little gay and a little more interesting for him. His boring day may need a lift and one of your duties is to provide it.
  • Clear away the clutter. Make one last trip through the main part of the house just before your husband arrives.
  • Gather up school books, paper, etc. and then run a dustcloth over the tables.
  • Over the cooler months of the year you should prepare and light a fire for him to unwind by. Your husband will feel he has reached a haven of rest and order, and it will give you a lift too. After all, catering for his comfort will provide you with immense personal satisfaction.
  • Prepare the children. Take a few minutes to wash the children's hands and faces. If they are small, comb their hair and, if necessary, change their clothes. They are little treasures and he would like to see them playing the part. Minimize all noise. At the time of his arrival, eliminate all noise of the washer, dryer, or vacuum. Try to encourage the children to be quiet.
  • Be happy to see him.
  • Greet him with a warm smile and show sincerity in your desire to please him.
  • Listen to him. You may have a dozen important things to tell him, but the moment of his arrival is not the time. Let him talk first--remember, his topics of conversation are more important than yours.
  • Make the evening his. Never complain if he comes home late or goes out to dinner, or other places of entertainment without you. Instead, try to understand his world of strain and pressure and his very real need to be at home and relax.
  • Your goal: Try to make sure your home is a place of peace, order, and tranquility where your husband can renew himself in body and spirit.
  • Don't greet him with complaints and problems.
  • Don't complain if he's late home for dinner or even if he stays out all night. Count this as minor compared to what he might have gone through that day.
  • Make him comfortable. Have him lean back in a comfortable chair or have him lie down in the bedroom. Have a cool or warm drink ready for him.
  • Arrange his pillow and offer to take off his shoes. Speak in a low, soothing and pleasant voice.
  • Don't ask him questions about his actions or question his judgment or integrity. Remember, he is the master of the house and as such will always exercise his will with fairness and truthfulness. You have no right to question him.
  • A good wife always knows her place.

Comments, anyone?

Tuesday, July 24, 2007

Mish Mash, Continued

As promised, I'm offering up even more mind-boggling mish mash for your reading pleasure.

Since the sleeve edges of this style are smocked, the next step is to run the sleeve hem edges through the pleater. I pleated three rows.

Now is the best time to hem those sleeves, add lace, etc. I haven't completely made up my mind on what I intend to do, so I'm skipping this step.

I'm ready to sew the dress together so I can pleat it. Almost. I am nonplussed by the sewing/pleating order of this style.

I cannot draw. But here is yet another feeble attempt. Look at the top row.


On the top row here we have a drawing of the sewing order recommended in the pattern instructions. I made it nice and colorful for you--the green lines are the cut edges of the pattern pieces and the red lines are the seam lines between the back, sleeve, front, and sleeve.

The bubble opens down the center back with a continuous lap. That's fine with me.

So what's my problem?

Maybe you noticed that the final back/sleeve seam is left unseamed. I don't like it. If I construct the bubble this way, I am going to have to push that unstitched seam to the inside and skip over it when I start smocking. I am also going to have to skip over the area in the center back where the continuous lap will be. The instructions tell me to create the continuous lap after the smocking is completed.

I can also forsee a potential problem in smocking the thing, since I always start at the center front, work all the way around to the side (the center back in this case), then turn the whole shebang upside down and work around to the opposite side. Doing it this way allows me to center the smocking design perfectly and the back opening edges will wind up as mirror images of one another.

And the final thing about this construction method I don't particularly like? I don't want a hand-sewn seam on that open shoulder, but it is not because I have any rabid aversion to hand sewing. The fact is that all these Little Dresses I make get worn. A lot. They go everywhere. They go through the washer and dryer and get ironed on a regular basis. I can only wish that I had such an active social life. They don't just stay in the Closet Full Of Dresses and look pretty. These girls are on the go! And since there is a great possibility that future Princesses may arrive, I want these dresses to last. I just think they will last longer if the seam is machine stitched.

So as I pondered these problems (we're talking lying in the bed late at night putting in some serious thinking time) I finally hit on another method of seaming this that would make me happy.

Let's look at the bottom row of the drawing. This one depicts what I plan to do. You can see that I am going to stitch up that final seam, which will give me a tubular shape. The blue line indicates the continuous lap opening.

I am going to go ahead and stay stitch the continuous lap opening and slice it open (it's about 7 1/2" long). I am going to use French seams on all the sleeve seams.

(I hear you out there saying that you can't run French seams through a pleater. Yes, you can. I do it on a regular basis. The secret is to steam the daylights out of the seam so that it is totally flat. Then when you run it through the pleater go extremely s-l-o-w when you come to the seams. I haven't broken a needle yet.)

So I have sliced the continuous lap open and sewn the seams. Now all of you are thinking I'm nuts because I can't roll this thing up on a Magic Stick. You're absolutely right.

I never intended to roll it. I live dangerously. I am going to pleat it free handed.

Rolling a bishop is always problematic due to the thickness of the seams, the potential sleeve flare issue, and the length of the piece. So I have graduated to the Advanced Stage of Madness. Here's how I do it:


I line it up and go slow. I pay attention to all the landmarks--seams, center front, center back. If those landmarks feed in straight, it's a piece of cake. I did this on the first try. And no, this is not the first time I've tried it. I've done it several times already and have only messed up once.

And if I do screw it up, I just pull out the pleater threads and give it another go. Here it is, all fanned out, pinned, and tied off!


I AM WOMAN!!!!


(Note to myself: Make CERTAIN that you tie a knot in that sleeve pleating next time. Just remember to spread the sleeve out completely flat and give yourself plenty of play in the pleater thread. You don't want to take a chance on a Complete Idiot holding a Little Dress that needs some smocking flopping down into a recliner and gleefully kicking up the footrest while the sleeve threads are somehow snarled up in the footrest, resulting in the sleeve pleater thread getting yanked completely out again, now do you? Especially if this happens after the dress is sewn together, because you now know that it will take a Complete Idiot an hour and a half to repleat said sleeve completely by hand.)

Monday, July 23, 2007

Woe Is Not Me, After All


So I slid out of the bed at dawn-thirty this morning, threw back a pot of coffee, shaved my ankles in the shower and rubbed a handful of mousse in my hair. I painted my face up and put on A Dress. And instantly, miraculously, I was ON for another school year. I attribute this to the Wearing Of A Dress, of course.


It was a really good day. By the time I arrived the sunbeams were beaming and so were the faces of my co-workers. I can tell already that we are going to have another great year. Excitement can be very contagious.


And all day, in the back of my mind, was Woodstock. For I knew, just as surely as I know that the freshmen won't be able to remember their locker combinations, that she was waiting for me to come home.


To refresh your memory, I'm using Jamie by the Childrens Corner, View D, for this little bishop bubble:


Even though technically this is not A Dress, for all intents and purposes we will forthwith consider it to be such. Case dismissed.

Figuring out which pattern pieces to use is quite a challenge. Just in case you're planning to make this particular view, I'll make it easy for you. There are just three--front, back, and sleeve.

Before I could do any actual cutting, I had to put in some thinking time. I had heard rumors that this pattern ran extremely short in the crotch length, so I checked out the pattern itself. Compared to other bubbles currently living in the vicinity, it was short. So I consulted the blog world for input. I was advised that it was in fact short (thanks, megsmocks!), so I lengthened the front and back on the shorten/lengthen lines. (Note to myself: Self, if you ever go into the pattern making business, be sure to place the shorten/lengthen lines in the same location on adjoining pattern pieces. Don't make sewing any more challenging than it already is.)

Since I added one and a half inches to the crotch length, that should take care of any possible crotch shortness problems. But I like to have backup plans, and here they are:
  1. The crotch length will be perfect, and I will smile.
  2. The crotch length will be too long, and I will smile.
  3. The crotch length will still be too short, and I will smile.

Case 1 above will make me smile because I avoided a problem.

Case 2 above will make me smile because I can add tucks to take up any extra length.

Case 3 above will make me smile because I will have tried my best to make this work, even though I didn't get the desired results. If this scenario develops, I will just cut the darn thing off and it will become a bishop bubble top.

I couldn't get both the front and back pieces in the next photo, but I'm hoping it will explain that little note to myself I wrote above. Although it really won't make a hill of beans in the end, it would have been more convenient if the shorten/lengthen lines were at the same level on the front and back pieces. Since there is the probability that some of the extra length I added might need to be tucked out, I wanted to mark my fabric so I would have an even, straight line all around the lower body to use as a starting point for those tucks. The easiest time to mark this is before I sew the thing together. The shorten/lengthen lines would have been the most logical (and easiest) place to do that, but they didn't correlate to each other.

You can see where I had to draw my tuck lines in the photo (I measured up 3 inches from the bottom of the side seam and marked the fabric front and back on the right side. When the bubble is sewn together, I will end up with a continous tuck line all around the body).


So those are my just-in-case lines if problem 2 develops. If I don't need them I will use my voodoo powers to make those lines disappear. Here's a better shot to help you see through all this mud I am trying to describe:


The most problematic part of making a smocked bubble is getting it to go through the pleater. After much study and even more aggravation I have hit on a method that eliminates this headache.

The first step is to examine the seams on the front, back, and sleeve pattern pieces. This is a photo of the sleeve pattern piece. Can you see how that seam is straight at the top (where I am measuring) and then it begins to flare out a bit?


That flare is what causes all the pleating problems. It is high near impossible to roll a bishop neckline evenly on a Magic Stick because that flare prevents the fabric from rolling in the way it needs to roll. So I measure the straight part of that sleeve seam because that part of it will feed through the pleater easily.

I consult my smocking pattern and see that I will need to pleat six rows. Then I measure my pleater to see if the six rows and the top seam allowance will fit within that straight part of the seam:


In my case it will, so I do a quick tap dance.

But what if it won't? Since different brands of pleaters have different spacing between the needles (my two do), you may have to adjust something. When this happens to me, I take my pencil and straighten out that flare in the sleeve. Headache avoided.


Here's another photo--in this one I am comparing the pattern to the pleater:


If you have a question, please ask. This was difficult to explain but easy to do.

And let me just add this Official Disclaimer:

I am not and never will be a sewing/smocking/pleating expert. I am an old dog who is willing to learn new tricks, so if you can offer some up, please do so.


More mish-mash to come.

Sunday, July 22, 2007

No High Heels For Her!

Could this be the next Heidi Klum practicing the runway walk?

Oh, looky, it's The Princess, and she's wearing Bubblegum!


I think she's getting the hang of it. Doesn't she look sassy in this Little Dress?


And take a look at this sashy little back, won't you:


This vintage pattern has another little detail that really adds to the finished look--the sash loops on the back:


Those little sash loops finish off just a little over one inch tall. Since the sash itself is four inches wide, those little loops control those gathers perfectly and also support the weight of the bow. That's the secret to a bow that won't sag down and look sad.

On The Hanger (front):


On The Hanger (back):


And on The Princess:


I'm loving it. And the spaghetti straps are the perfect length, too. They are the right length for tying into double loop bows on the shoulders. I couldn't get a picture of them tied for you that way, though. Like the other grandmother is wont to say, dressing this little darling is like trying to put clothes on an octupus.
I can already see another one of these in the near future, next time with the scallops! But right now, I'm off to cut out Woodstock.

Saturday, July 21, 2007

Conversations With A Dress

Shhhhhh.......can you hear them?


Fade in.....

The Setting: Outside at 5 a.m. on a Saturday morning
The Characters: Retro Grace and Bubblegum

Retro Grace: Good morning!
Bubblegum: (Yawns.) Oh. Hi. Where in the world am I?
Retro Grace: On the back porch.
Bubblegum: Oh. OK. Gee, why am I up so high?
Retro Grace: I think that plant over there needs some water. Check it out for me.
Bubblegum: Hmmm.....yes, it looks a little dry.
Retro Grace: Well, let's hope it gets rained on today.
Bubblegum: What???? Aren't you going to water it????
Retro Grace: Nope.
Bubblegum: Why on earth not????
Retro Grace: Time is running short, kid. Less than 48 hours to go.
Bubblegum: Oh, no! I forgot! You have to go back to wor-----
Retro Grace: That's enough out of you, smarty pants. I'm tired of warning you! Don't you say that word!
Bubblegum: Gee, you don't have to be so touchy............can I ask you a question?
Retro Grace: Sure thing. But go ahead. My coffee is getting cold on me.
Bubblegum: I like these cute little spaghetti straps.......but what if they're too long for The Princess?
Retro Grace: Don't worry. I have sharp scissors and nerves of steel.
Bubblegum: Ahem. (Clears throat.) Ahem.
Retro Grace: Are you choking, or what?
Bubblegum: AHEM.
Retro Grace: Out with it, kid. Time is wasting.
Bubblegum: AHEM. Don't you think I need A HEM???
Retro Grace: Well, I'll be darned. You sure do.
Bubblegum: And maybe some buttonholes, too, while you're at it?
Retro Grace: My, my, you're a pushy little thing, aren't you?

Retro Grace takes Bubblegum down and goes inside. Pours more coffee and climbs up the stairs....

Fade out.

Friday, July 20, 2007

Some Assembly Is Required

I've been to the sewing room! Meet Bubblegum, all cut up and ready to go:


I am using the vintage dress pattern Simplicity 1149 from the earlier post. Just check out the details on these little bodice pieces:


Tiny little darts for a perfect fit. And it's lined. And check out the scallops on this piece:


Why the Big Four don't reincorporate these little dressmaker details in their children's patterns anymore is beyond me. After studying those scallops and deciding that they were actually hand drawn, I put my mind to figuring out exactly how the deed was done. Here's my theory:


Works for me. And easy to duplicate at home, too. Just draw another line about 1/4 inch inside the existing seam line, put your spool on there, and draw the scallops, going around the spool until you hit the intersecting lines!

Any time I'm making something that has a critical corner, I like to mark the sewing line on the corner. Since I used fusible knit interfacing on the front and back bodices, I fused first and marked those corners second:


This is just one of those little things that seems to help me get good results the first time around.

One change I made was with the sash. The original directions have you cut the sash pieces and narrow hem the edges. As you can see in the next picture, there is a distinct difference between the right and wrong sides of this fabric.


So I listened when the Fabric Spoke To Me and said "if you cut me double, and sew me up with a 1/4" seam, no one will see my ugly side, and you won't have to use the Bad Language when you do the narrow hem thingee." So I did. See the sash?


And the cute little bodice with its little spaghetti straps?


Next up--the skirt!

Wednesday, July 18, 2007

Blogger is Really Weird

Or maybe I am just overtaxed at the moment. At any rate, scroll down. Today's post is listed as Sunday. Whatever.

Tuesday, July 17, 2007

I Wore A Dress Today

Yes I did. I put on A Dress, loaded myself into the car, and went on a road trip to the not-so-local Joann's today. What prompted this visit?

I've spent some time in my closet. And the laundry room. And the sewing room, where today's menu includes an abundance of fabric with a nice side dressing of unironed ironing.

I've gained 7 pounds this summer. Yall remember all about the darn bicycle, don't cha? This weight gain is definitely not my fault. It has absolutely no relationship to the amount of time I spend with a fork in one hand and a knife in the other.

I'm sorta tallish. Well, tall actually. I come in a little over 5'10". I have the long Inspector Gadget model arms with matching legs. To add insult to injury, I am also long-waisted. I have never bought a long-sleeved anything off the rack that was truly long-sleeved, on me at any rate. I always end up looking for three-quarter length sleeves to begin with, because that's what I'm going to wind up with in the end. And not once in my lifetime, not a single solitary time, have I ever had to hem up a pair of store bought pants. These are the reasons I don't shop. I hate, loathe, and despise clothes shopping. I always end up with clothes that don't fit well, are too big (to compensate for all the fitting issues), and are just plain aggravating to wear. There are things in my closet that I just plain won't wear anymore--they make me so miserable that I actually get mean when I wear them. Needless to say, the local Goodwill store is about to get a ton of barely used merchandise.

Even though I can barely stand to type out these words (don't worry, I have already fortified myself with five cups of coffee and some Jello chocolate pudding), the dreaded event is upon me. In six days I have to go back to school. There. I said it.

I need some clothes. And I need them now. My problem is that I have trouble facing reality. The reality is that I am not going to lose 30 pounds in five days. Heck, I'm not going to lose 30 pounds in the next year. Until now, this refusal to face reality has kept me from making clothes for myself, which I used to do all the time. Because in the back of my little mind was that little voice that kept saying "If you make that beautiful thing now, it won't fit you when you lose weight."

I'm wearing earplugs now. I am going to make myself some clothes that fit me. If I only get one piece done every two weeks, my outlook on life will be much more pleasant. Plus, wearing one thing that fits will encourage me to make another thing that fits, and so on and so on. See how much progress I'm making already? I'm actually getting excited about this! See how the Wearing Of A Dress can improve one's thinking skills?
The Force Was With Me. Here's evidence:

I think I wound up with ten pieces for tops/blouse/skirts/dresses. And enough black linen for a skirt and some slacks. All at 60% off, too!

And the patterns:

I know yall spotted those two dress patterns, didn't you? I thought so. If any of you have made either one of those dresses yet, please drop me a comment and let me know how yours turned out. They are Vogue 8382 and Simplicity 0521 (the Threads dress).

And no, I'm not giving up Little Dresses. This year I'm not teaching extended day. I've done that for the past few years, and it consumes a couple of hours each day of my at-home time. So I'm not doing it any more. That extra time, with some good advance menu planning, should translate into more sewing/cooking/sewing/smocking/sewing/laundry/sewing/cleaning/sewing time than ever.

Now if I can just get this dang income tax return done today ...................

Sunday, July 15, 2007

The Hanger

You may have noticed that I take photos of all my projects On The Hanger.

What you don't know is that The Hanger always goes home with The Dress. Always. Without fail.


Now if I were a Hanger Gourmet, I would decorate The Hanger before sending it off to live in the Closet Full of Dresses. But I don't. I send it out naked. Why would I waste time dressing a hanger, when it's girls who crave the dresses? I'll leave the Hanger Dressing to someone else.

Here we have a totally naked hanger. It wants to go live in the Closet Full of Dresses, too.


It's been hanging out with this pile of dress fabric:


The Princess came to babysit me, and while she was here, the fabric Spoke To Her. She was checking the yardage on this one (those are her fat little legs in the picture, not mine):


And she thought this might make a nice spring frock, with a nice full skirt to cover her dainty little knees:


You can tell that The Sandman was also hanging around that afternoon, can't you?


She liked this one a lot. See how she's holding it up to check the color against her complexion?


It just so happens that this vintage pattern mysteriously appeared in the sewing room. It's Simplicity 1149, from the wonderful pattern makers of 1955:


Wouldn't this be nice for those sultry August afternoons? Here's the back:


I think the sash is a must-have, don't you agree? Not sure yet about the little jacket, though. It might conceal the total cuteness of the dress, I'm thinking.

Oh, well. Back to the dread income tax. I'm busily depreciating my assets, which is really strange if you think about it. Mother Nature is doing the exact same thing to me.

Bluebonnet for a Blue-Eyed Babe

In celebration of her first birthday, The Princess had her portrait made this past week. What's a girl to wear? Bluebonnet, of course!


Here she is practicing patty cake!


I love the fullness and complete girliness of this dress. Look at the back:


You may remember that this is the Mary De pattern from the Childrens Corner. I will definitely make another one of these.


I have this theory, see. I firmly believe in dresses for girls--little girls, big girls, skinny girls, fat girls, young girls, old girls, and girls with skinned-up knees. My theory is that if I unleash an avalanche of dresses in their direction and smother my granddaughters with constant and regular doses of them, they will develop a love of dresses and live with me forever in the Land of Dressdom.

And I know that I am not alone in this theory. I read and surf blogs, too, you know. There are tons of you out there who share this theory, too, whether you are in tune to it or not. Of course, some of you, like me, are completely Out Of The Closet on this topic. Erin over at Dress A Day comes to mind immediately. For all the rest of you, don't be afraid. The water's not deep. Just jump in the boat!


The official On The Hanger photo of the front:


And the close-up:


On The Hanger back view:


And the close-up:

I just adore that overlapped double button closure, don't you?
And by the way--Number One Son recently bought a falling down house and has started renovations on it. Check out the link to his blog (Be It Ever So Humble) in the sidebar!

Friday, July 13, 2007

She's Showing Her Slee-vage

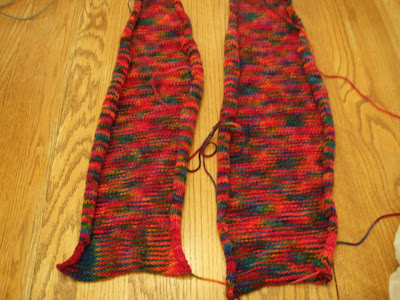
Still busy working on the wool sweater-I know it's insane, but yall know what I say about the heat in the South-which is Eloise from the Noro Knits book by Jane Ellison, by the way. Here's the sleeves, all curled up on their little selves:


They curl because they are worked in reverse stockinette stitch (or the back side of the knitting--geesh, isn't that a much easier way to understand it? but I digress).

Next we have two fronts, a left one and a right one, up close and personal-like:


If you look carefully at that photo, you will understand why I am busily knitting a third front.

Why? Because I originally bought three huge hanks of this stuff (3000 yards) and since it's all hand-dyed, each hank varies. What looked to me to be identical stuff actually has knitted up into two very obviously different colorations. So I am making another front out of a more closely matching hank. I figure I'll have about 1200 yards left over when I'm all done. Scarf, anyone?

Oh, yeah, I'm still cooking--supper Thursday night:


Supper Friday night:


Carbs, anyone?


I stand at the bottom of the staircase and whisper "food" and these guys appear EVERY time!